How To Start A Blog In 2025: The Most In-Depth Guide

When it comes to learning how to start a blog, there is a method to the madness.
You don’t need to be a professional writer; you just need to start, run and scale your blog as a real online business.
A lot of the blogging advice is from 10 years ago and is outdated. Since then, Google has evolved and changed its algorithm thousands of times, making the old approaches obsolete.
In this ultimate guide for beginners we’ll cover the newest tactics on how to start a blog in a step-by-step format. I’ll also provide you with easy to implement information and all the resources you need to launch your blog and scale it faster.
Now, let’s skip right into it and address the elephant in the room.
How to start a blog?
To make it easier, I’ve broken down the process into smaller, actionable steps so you can get started today.
Here is How to Start a Blog in 7 Easy Steps
1. Choose your blog niche
2. Register your domain name and setup your web hosting
3. Install the WordPress blogging platform
4. Install WordPress plugins
5. Optimize the SEO settings of your blog
6. Create content
7. Build backlinks to your blog
Disclaimer: This post includes affiliate links that may provide me with a small commission at no extra cost to you. Please note that the links are for the best tools and software you need to start a successful blog.
Take the time to read through the full guide, which covers everything you need to know as a beginner.
Save this post to your bookmarks to come back to it again later, as I’ll continue to update it.
First you need to host your blog. Start with Bluehost and get 65% discount with my link.
1. Choose Your Blog Niche
Every blog needs a niche. It’s the overall topic that you focus on and write about.
Choosing the right niche will define the earning potential and the long-term success of your site.
There are hundreds of niche ideas you can choose from: fitness, travel, meditation, technology, cooking, the list goes on. However, it’s important to focus on a single niche or you run the risk of spreading too thin.
Most professional bloggers will advise you to choose your blog niche based on your passion, arguing that it’ll help you stay motivated and avoid writer blocks.
But they never tell you how to turn your passion into revenue.
The common belief is that your ideal niche is where your passion, skills, knowledge and interests meet.

There are three problems with this approach:
1. It doesn’t include monetization.
2. It only focuses on you, completely ignoring your audience.
3. It doesn’t consider that blogging is a Google-driven business.
This strategy could work for a personal blog. But, if your goal is to make money blogging, this is a recipe for failure.
Investing time and effort without gaining financial return or readership for a long period will get you discouraged, your passion will fade away and eventually, you’ll give up.
When I started this blog it wasn’t my passion that kept me focused and helped me maintain my writing schedule, it was the reason why I started the blog.
It was a way for me to achieve financial freedom, so I can quit my office job and have more time to spend with my family.
Why do you want to start a blog?
- To create a side hustle.
- To replace your job’s income.
- To escape the 9-5 life.
- To have more free time for your loved ones.
- To work remotely from anywhere in the world.
Here are the most popular responses from new and pro bloggers:
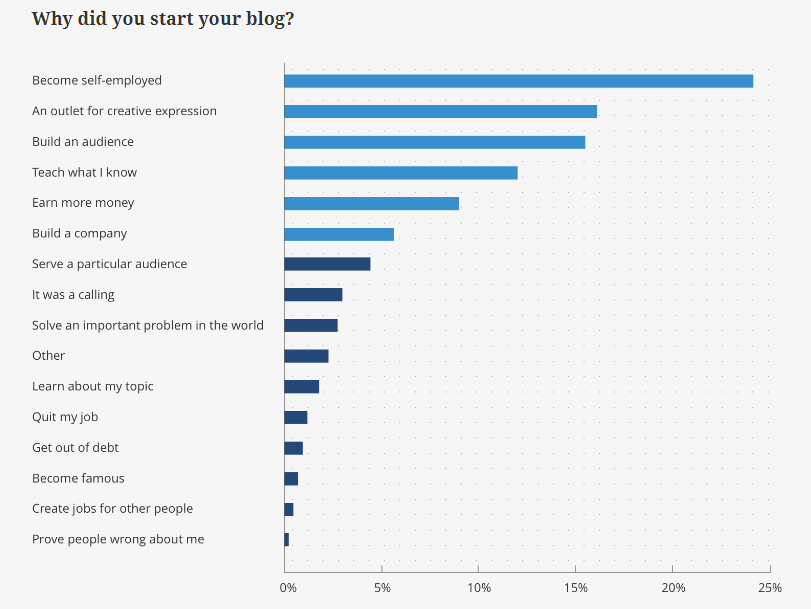
-Source: convertkit.com
The stronger and well-defined your reason, the easier you’ll find a way to reach your goal.
When I was figuring out how to start a blog I learned the hard way that blogging can’t be sustained on passion alone. That’s why I used my vision and turned it into purpose, which kept me on track and motivated.
Think about it logically, no successful business was ever built purely on passion.
Let’s say you’re passionate about cars and you start an e-commerce business selling products in the car accessories niche.
Will you buy stock, create a website, upload product images, and promote the business through online channels, hoping that customers will find the store? Leaving your success to chance.
Or will you instead, try to increase your chances for success by first doing some research about:
- The size of your niche and potential target clients.
- The wholesale and resell price of the products (sales margin).
- How much are similar items selling for?
- Can you make a profit selling the product?
Only if the findings are showing your business idea can be profitable, you’ll then invest in a website, stock, marketing, and promotion.
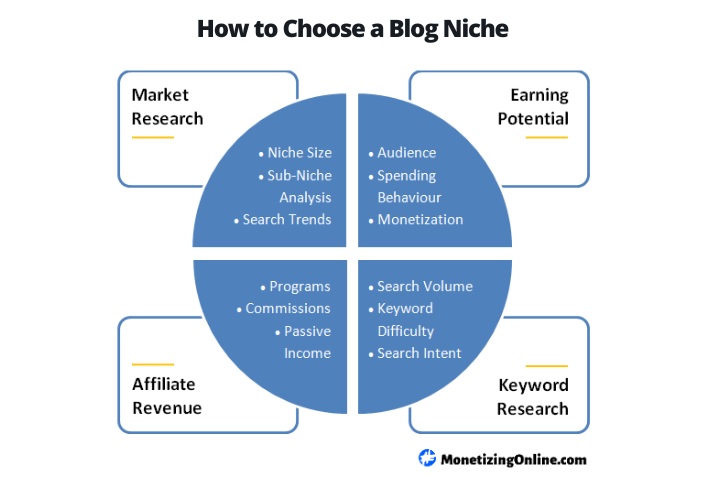
Now, let’s approach and start your blog the same way, like a real online business.
To do this, we won’t choose your niche based on passion, instead we’ll use a combination of key blogging metrics:
- Market Research
- Blog Earning Potential
- Affiliate Revenue
- Keyword Research
1. Market Research
Choosing a niche is a pivotal element in the process of learning how to start a blog, but it’s almost always neglected. Many new bloggers rush through the research, so they can start writing.
However, keep in mind that you’re a business owner, not just a copywriter or content creator. And as such, you need market data to get a general idea of the niche size and the competitive landscape, before you get to the writing.
Full time bloggers will recommend finding a very small niche for your blog to avoid competition and easily monetize it.
The problems with this approach are:
1. Small niches have small audiences, not enough demand, scalability, and earning potential.
2. A tiny niche won’t generate enough data to use as feedback to improve and adapt your content.
3. Lack of competition suggests that the monetization prospects are low.
The solution is simple:
Pick up a broader niche where you can identify different sub-niches and publish content to test them until you find the ones that work.
You also want to look for emerging topics in the sub-niches and cover them before the competition has entered.
You can’t force Google to rank your content but you can use its feedback to understand what sub-niches you’re ranking for on the top pages. Let the search engines tell you what areas they consider you to be an expert in and pursue these sub-niches by aggressively publishing content.
One of the key elements to choosing a profitable niche lies in the ability to generate revenue from multiple sub-niches in the main niche.
To put this into perspective, let’s say you start a blog about personal finance, focusing on credit cards. There’s only so much you can write about and you’re restricted to affiliate revenue from one product.
Instead, you want to cover all aspects of personal finance: credit cards, savings, mortgages, loans, checking accounts, insurance, investments and so on. To get ahead of the curve, publish content on the emerging trends in the niche like the use of AI in personal finance, positioning your blog to outrank any new entrants in the field.
Creating content about multiple products and services in multiple sub-niches will help you increase your blog’s income 10 fold.
It’s a numbers game.
If you have 10 affiliate sales per month in a sub-niche, to maximize revenue you’d rather have:
10 sales x 10 different categories = 100 sales/month.
Compared to:
10 sales x 1 category = 10 sales/month.
You can find a profitable niche by performing a quick 15-20 minutes market research, using the correct tools.
Here’s how to do it.
For example, let’s say you want to create a digital marketing blog. Before you start publishing content you want to determine the size of the niche and what sub-niches you can cover.
Start by searching for your topic on Google.
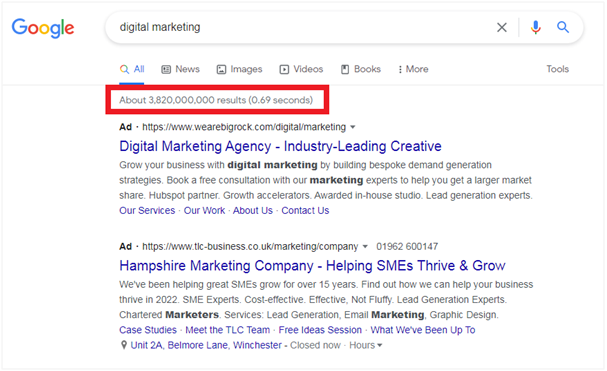
The search returns a huge amount of results, suggesting that digital marketing is very broad niche, but you can niche down a bit and then expand when you blog gets traction.
To generate ideas, scroll to the bottom of the search results page, where you can find related search variations.
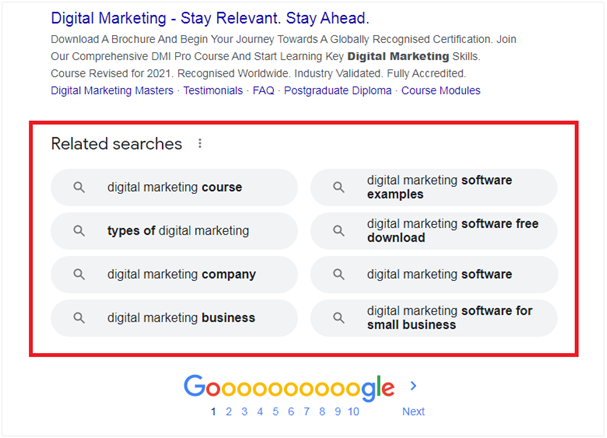
Let’s try digital marketing software and check how many searches it gets every month.
Go to Google Ads Keyword Planner and enter the term.
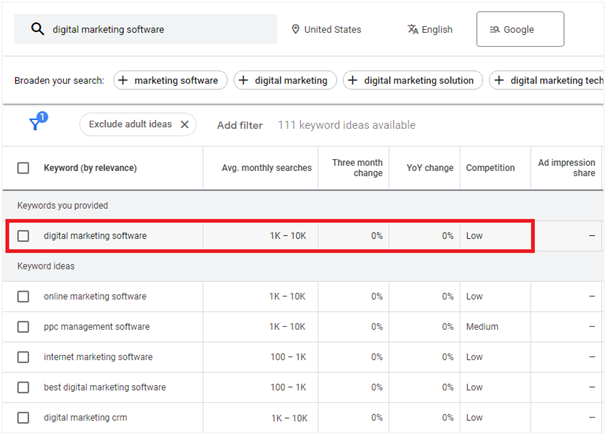
Digital marketing software could be a good choice for a niche. It has a high number of monthly searches and low competition. But more importantly it’s broad enough with several sub-categories to exploit, like: software for content marketing, mobile marketing, social media marketing, SEO, email marketing, affiliate marketing, etc.
To get precise search volume and competition data, so you can find your ideal niche faster, use Semrush. It’s the best tool to generate a tone of other high-volume, low-competition keywords to target in your posts.
To build a sustainable blog, it’s also important to understand if the overall trend of your niche is increasing, declining, or flat over time.
Head over to Google Trends and type in digital marketing.
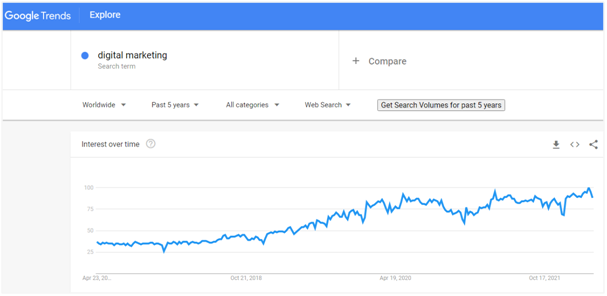
The search trend is steadily increasing, signalling that the audience for the overall category is growing.
Repeat the search, using digital marketing software.
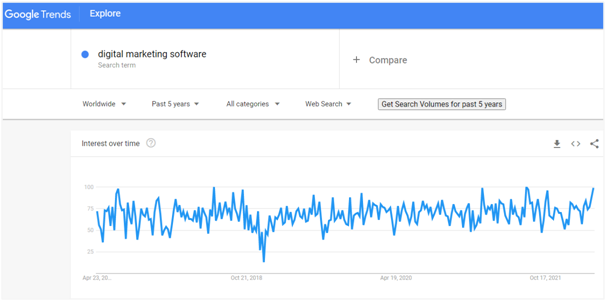
The interest in the chosen niche is also rising over time.
Stay away from topics on a declining search trend.
Because both, the broader and the smaller niche are attracting more interest over time, it’ll help you scale your blog in line with the expanding audience size.
In fact, the global digital marketing software market size in 2021 was $56.52 billion, forecasting a growth to $264.15 billion in 2030, indicating that the uptrend will continue.
After completing the market research, naturally this how to start a blog guide will look at the revenue potential of the audience.
2. Blog Earning Potential
There are a few main factors that can help you estimate the income potential of your blog before you have even started it:
1. Understand your target audience.
2. Determine the spending behavior in your niche.
3. Effective use of monetization methods at different stages of your blog.
Your goal as a blogger is to truly understand your audience and address their pain point by providing solution-based content. Once the audience enters your sales funnel you can then move them down the funnel, leading them to making a purchase.
Put yourself in the position of your audience. It’ll make it easier to understand their way of thinking, the challenges they face and the rationale behind their buying decisions.
Let’s look at Apple as an example. Who buys Macbook Pros and why?
- 20-55 years old people.
- Media or tech savvy.
- Creatives, students, managers or professionals.
- Middle to high-income individuals.
- Looking for high-resolution, quality and innovative hardware and software.
- Willing to pay a higher price for a better user experience.
It’s clear that you not only need to solve a problem for your audience, but you need to solve a problem your audience is prepared to pay for.
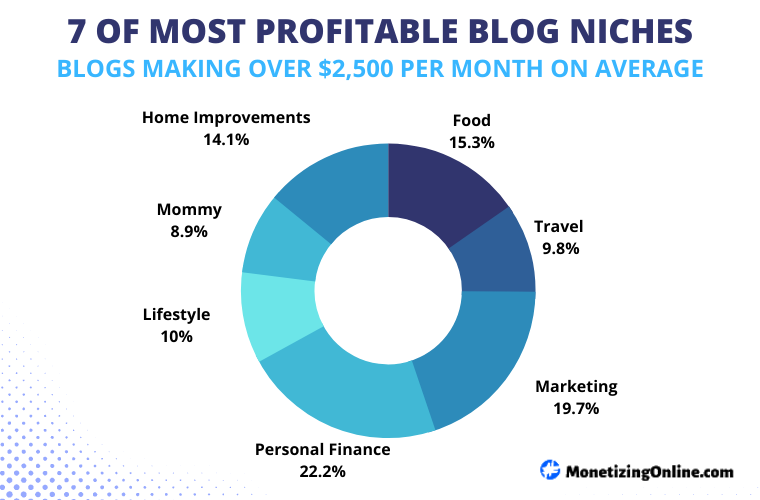
Some of the most lucrative niches, where the audience is willing to spend the most, include: food, travel, personal finance, marketing, mommy blogs, lifestyle and home decor/improvements.
Understanding your audience and how much they’re spending will transform your website into a real online business and not a personal blog.
Most bloggers will suggest using multiple revenue streams when it comes to monetization, with Google Ads, affiliating programs and digital products like an online course. These are the most popular choices as they’re the most passive.
This approach however, is counterproductive since these revenue streams need a larger number of visitors to generate income. As a new blog, you’ll start with a smaller audience; thus you want to make the most of it by using a monetization strategy in line with your monthly visitors.
The most efficient way to monetize a new blog is through consultancy or 1 on 1 coaching. It’s less passive, but the low volume, high price model of consulting will allow you to start generating revenue faster without much traffic.
Let me explain using some calculations:
If your new blog has a 100 unique visits per month at conversion rate of 2%, you’ll get 2 sales per every 100 visitors.
Normally, you can generate $0.02-$0.10 per page view from Google AdSense.
- 100 visits x $0.10 = $10/month
As an affiliate, you can earn $50 per sale (depending on niche and product).
- 100 visits x 2% conversion = 2 sales/month
- 2 sales x $50 = $100/month
But if you’re offering online consulting service, you can charge $1,000 per client.
- 2 sales x $1,000 = $2,000/month
To supercharge you blog’s revenue, choose a lucrative niche and instead of chasing income from low revenue ads and affiliate links in the beginning, when your traffic is low, focus on selling high ticket consulting service.
This strategy can get you form $0.00 to $5,000 monthly income in 6 months.
There’re different revenue streams you can use to monetize your blog, but you only need consulting in the beginning, as efficiency hides in the numbers.
When your audience starts growing over time you can swiftly transition from consulting to passive income from affiliate marketing.
3. Passive Income from Affiliate Marketing
Affiliate marketing is best way to generate passive income, once your blog starts getting traffic. It allows you to make money 24/7 without much input, so you no longer need to trade time for money.
Affiliate marketing is an advertising model based on recommending products and services of other companies. In exchange, the affiliate earns a commission on each sale through a unique link associated with the recommendation.
Here’s how making money with affiliate programs work:
1. Sign up for an affiliate program on the company’s website or through an affiliate network.
2. After your application is approved you get a unique affiliate tracking link and access to performance data and reports to help you track: clicks, sales, and any future payments due to be paid to you.
3. Insert the link in your blog content, creating a [hyperlink].
4. When a user clicks on your link, they’re redirected to the company site. At the same time, a tiny file (cookie), tracking activity for 30 to 90 days is stored on their browser. Even if a transaction isn’t made on the spot, any purchases during the tracking period are still credited to you.
5. Customer makes a purchase from the website.
6. The sale is recorded through your tracking link.
7. You get paid a commission on the sale.
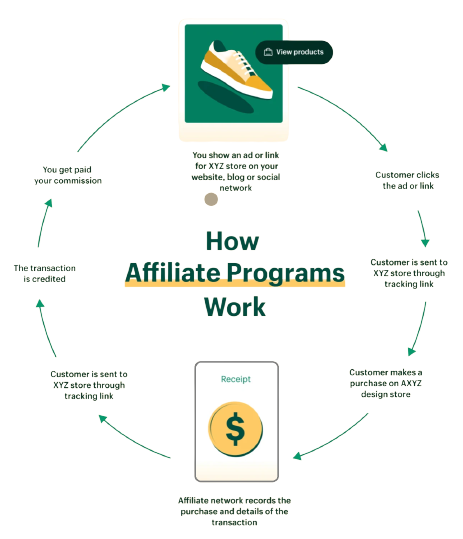
-Source: shopify.co.uk
Affiliate programs are free to join and since there’s no upfront cost you can start generating revenue right away. You can earn between 5%-50%, or get a flat rate per sale and you can earn recurring revenue, or receive one-off payment per sale. Commission rates and payout structures depend on the product or service you recommend and the terms of the affiliate program.
To generate passive income with an affiliate blog, you need to be in a lucrative niche with strong affiliate revenue potential.
The most profitable niches for new blogs are: personal finance, marketing, travel, technology, crypto, making money online, fitness and well-being.
Familiarize yourself with the most successful blogs in the niche you’re planning to pursue, so you can understand how they earn affiliate income and emulate their approach.
Good source for inspiration and ideas when learning how to start a blog are sites like:
- Crypto/Stocks – CryptoVantage, HedgeWithCrypto, Benzinga
- Technology – Gizmodo, TheVerge, CNET, TechRadar
- Finance – MillennialMoney, GoodFinancialCents, TheCollegeInvestor
- Fitness & Wellbeing – Health.com, Prevention, MensHealth, Self.com
- Software – G2.com, PCmag, SoftwareReviews.com
What these websites have in common is that all of them publish high-quality review and how-to articles on multiple sub-topics of their main niche.
The blog posts generating the highest revenue in most niches are list/review posts, including the word “best” . These are transactional posts with high search volume and high conversion.
People searching for best + product or service are often ready to make a purchase; they’re just looking for the right solution.
If you google Best Electric Bikes, the results on the first page are all affiliate blogs. Google ranks them higher than the e-bike shops during searches, because they publish long-form, in-depth content and reviews.
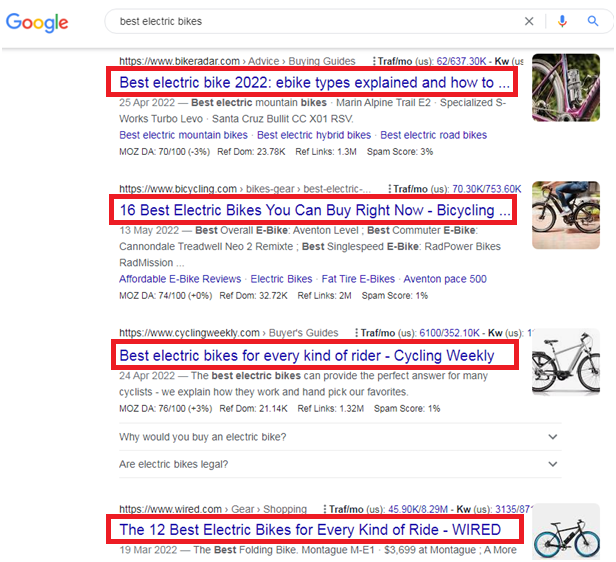
You can search for Best Cameras for Underwater Photography or Best Crypto Cold Wallets and you’ll get the same results. The more you understand the concept of affiliate marketing, the more you will start noticing affiliate websites all over the internet.
To make money with an affiliate blog you need to select a profitable niche with high commission paying affiliate programs and publish quality review posts that rank on the first pages of Google based on keywords.
Now, let’s look at the role of keyword research when it comes to planning and choosing your blog niche.
4. Keyword Research
Keyword research is the last and perhaps the most important element when it comes to choosing a blog niche.
Ask yourself:
How many people are searching for the topics I’m planning to write about?
Each blog post you publish needs to focus on one keyword only. But, if no one is searching for the keyword you’re targeting, no one will find your content and your blog will never get traffic.
So, when you start a blog it’s useful to have basic understanding of how to do effective keyword research, including: search volume, keyword difficulty and search intent.
User search intent is the specific reason why someone is searching online.
There are four main types of search intent:
1. Transactional – users looking to make an immediate purchase.
2. Informational – searches for information on a specific topic.
3. Navigational – if you want to visit a particular website [Amazon].
4. Commercial – researching a potential future purchase.
Transactional posts typically contain intent-specific word like “Best” or “Buy” + keyword, for example Best Video Conferencing Software.
Whereas informational articles include words like “How-to”, “Best-way-to” or “Why”, a good example is How to Make Money Online.
You want to publish 80% transactional and 20% informational posts. You only need to focus on these 2 types of search intent as they’ll drive the most traffic and revenue for your blog.
To find valuable keywords to target, you have to establish their monthly search volume and keyword difficulty.
Luckily, there’re various SEO tools available to help you understand the search data. You can use SEMrush, SE Ranking and Moz Pro to filter through keyword metrics like:
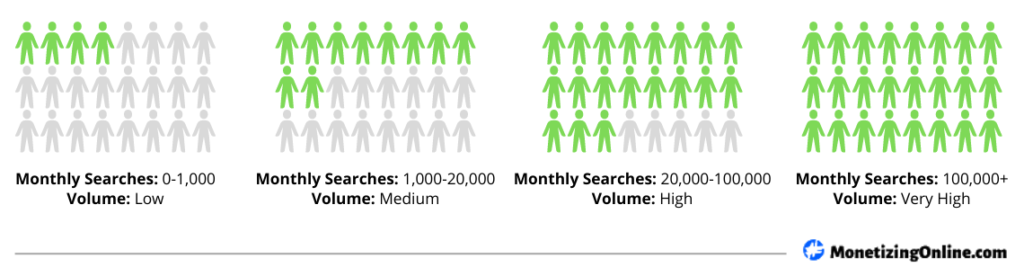
Monthly Search Volume – the average number of monthly searches for a given keyword. Search volumes can be grouped into: Low, Medium, High and Very High.
Keyword Difficulty (KD) – estimates how easy it is to rank for a keyword on the first page of Google during organic searches. It measures the competition on the scale from 1 to 100; where the scale is divided into 4 levels: Easy, Medium, Hard and Very Hard.
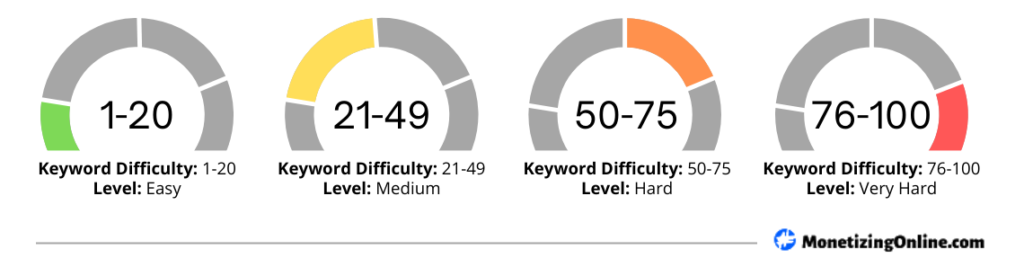
Cost-Per-Click (CPC) – amount of money spent for each click in a paid marketing campaign. Even though, we don’t want to run paid ads, it’s important to know that the higher the CPC, the more valuable the word.
Keyword Ideas – find variations of your target keyword and check which ones have the highest search volume and the lowest competition.
Now that you understand search volume and keyword difficulty, let’s combine these individual metrics to help you find valuable keywords to target.
From a search engine optimization (SEO) perspective, we can generate various combinations with these 2 components.
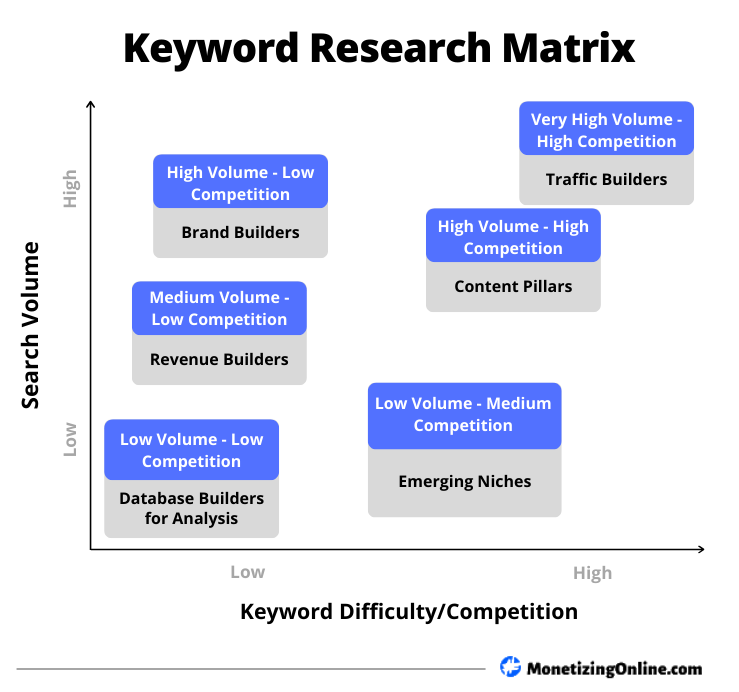
New bloggers take the traditional keyword research approach when learning how to start a blog and go after low volume-low competition terms. However, these keywords have very low and inconsistent search volume and won’t drive any revenue. Instead, your new blog needs a mixture of: medium volume-low competition and very high volume-high competition keywords.
1. Medium Volume-Low Competition Keywords
You want to find and target medium volume-low competition keywords in your content as these are the revenue drivers for your blog.
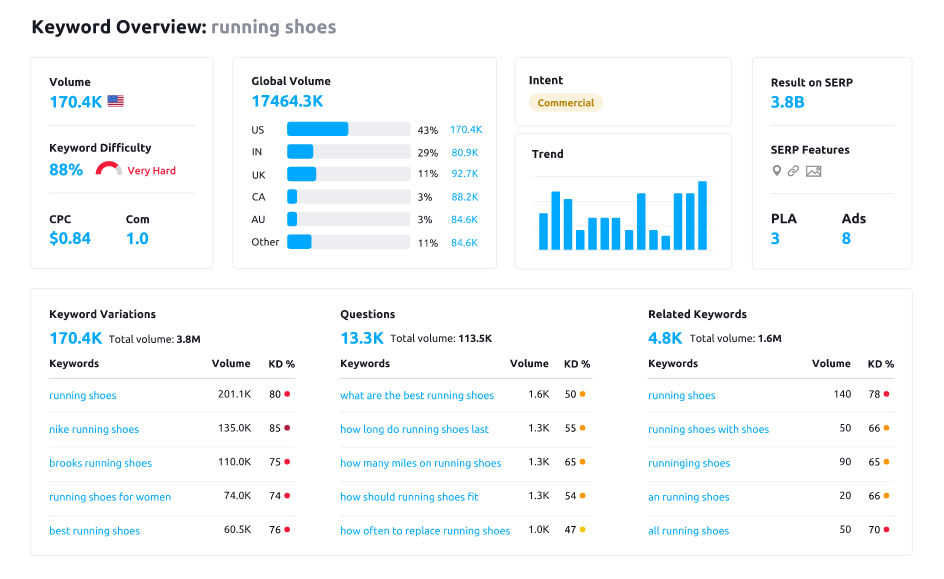
For example, if you’re creating an outdoor sports blog, you can write an article on Best Snowboard Brands. Using the SEMrush Keyword Research Tool we can see that the term has the following metrics:
- Keyword: best snowboard brands
- Monthly search volume: 6,600
- Keyword difficulty: 17
- Cost-per-click: $11.79
Keyword difficulty is low at 17, suggesting that ranking for this term should be relatively easy.
Because we know that a page ranking number 1 on Google gets 32.5% of the organic traffic on average, we can calculate that position #1 will bring in 2,145 (6,600 x 32.5%) monthly organic visitors.
On top of that your post can rank for hundreds of variations of the main keyword, such as: winter sports equipment, snowboarding gear and equipment for snowboarding, pulling additional 2,000-4,000 monthly page visits.
The CPC is also high, meaning that the keyword has commercial value.
The keyword contains the word “best”, indicating strong search intent which you can match with a list-type, transactional posts.
When looking for relevant keywords to target, it’s important to search for more specific terms. Instead of workout search for high-intensity interval training or crossfit exercises; instead of shoes, try searching for running shoes.
Make sure to check the keyword suggestions for other variations of the term that you can either target or include in your content and headings.
-Source: semrush.com
To find medium volume-low competition keywords in any niche, head over to SEMrush and using the filter set the keyword search volume to a minimum of 1,000 and the keyword difficulty to a maximum of 20. Around 90% of your posts need to cover these keywords, since they will generate the most revenue for your blog.
Pro Tip: When you find medium volume-low competition keywords go after them and publish the content immediately. The metrics will change as more bloggers will find these terms and target them over time.
2. Very High Volume-High Competition Keywords
Very high volume-high competition is the second type of keywords you need to target in your blog posts. These keywords will form the backbone of your blog. They’re more difficult to monetize but can pull in a tone of traffic and help you increase the size of your email list.
Let’s consider the term How to Make Money Online.
- Keyword: how to make money online
- Search volume: 107,000
- Keyword difficulty: 63
- CPC: $1.97
On the surface, this keyword has significantly higher search volume compared to Best Snowboard Brands. As a result, landing an article in the top 10 positions can generate 15,000-25,000 monthly visits to your blog. And with the variation of the keyword that you’ll also rank for, you can easily double this amount of traffic.
If we dig deeper, the keyword contains “how-to” suggesting the post is informational rather than transactional. It also has lower search intent. With Best Snowboard Brands, we can determine exactly what the user is looking for, whereas with How to Make Money Online is really unclear. There’re hundreds of ways to make money online, including: blogging, dropshipping, podcasting, freelancing, etc.
This is why the CPC – the commercial value of the keyword is lower at $1.97.
To find very high volume-high competition keywords, go to SEMrush and using the filter options set the keyword search volume to a minimum of 20,000 and the keyword difficulty to a maximum of 75.
The keywords should appear in well though, long-form, high-quality, detailed, informational blog posts, forming up to 10% of your overall content.
In summary, your goal when searching for keywords to target is to find very high volume-high competition terms to use in “how-to”, informational posts that solve a pain point for your audience. You also want to find medium volume-low competition keywords that can be paired with the word “best” and include them in a listicale, transactional posts to generate revenue. And this is how you find a lucrative niche to tap into through keyword research.
Some of the best keyword research tools that you can use include:
In this first step, we covered the most important element of how to start a blog – choosing a niche. Remember to pick your niche based on key blogging metrics, like: market research, earning potential, affiliate revenue and keyword research, not assumptions.
Now, let’s move on to the next step, where we choose your domain name and set up the web hosting for your blog.
Start your blog today with Bluehost and save 65% on your hosting.
2. Register Your Domain Name and Setup Your Web Hosting
You can register your domain name for $15 through a domain registrar company and get your web hosting separately.
Or you can get started with Bluehost instead, and get a free domain name for the first year, saving $15.
Let’s choose your domain name and set up your hosting.
1. How to Choose a Domain Name?
A domain is a unique name that helps users to identify and access a website via the internet. For example, my domain is monetizingonline.com.
Although, choosing a domain name is important, since it represents your site and brand, don’t over think it. In fact, it took me 2 weeks to choose my first domain. Time I could’ve used more productively – to design my site and draft the content.
Common advice is to pick a specific domain that is an exact match to your blog niche. However, what if your niche is too narrow? Or if you run out of topics to write about? And with over 379.2 million domains registered worldwide, it’s even more difficult to find the perfect domain.
What is the solution?
Choose a domain that’s broad enough to cover the different layers of the main niche of your blog.
For example, the main focus of my blog is making money online and software reviews. This could include anything from: how to start a blog, how to make money from home, web hosting, website builders and email marketing to making money through social media, the list of topic ideas is endless.
Go for a broader domain name but create blog posts and pages that are specific to your blog’s niche.
Other things to consider when choosing a domain:
Domain Name Extension
There are hundreds of domain name extensions available to choose from. Some of the most popular ones are:
- .com – short for commercial.
- .net – short for network.
- .org – short for organisation.
- .info – short for information.
The .com is the most widely used domain extension and the most trusted by both Google and web users. As a result, it automatically increasing your site’s online visibility.
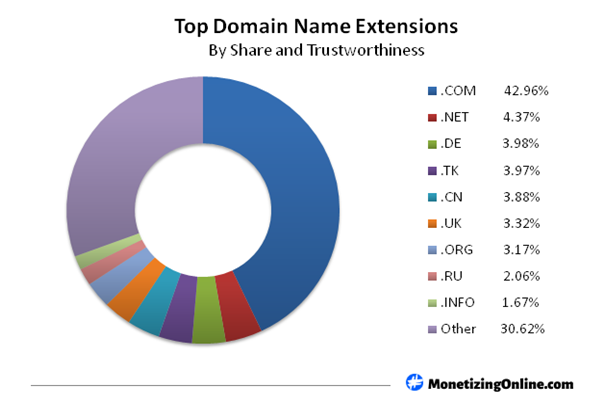
-Data source: w3techs.com
Keep Your Domain Name Short
When it comes to domains, shorter names are always better.
Take for example some of the most popular websites like Google, Amazon, Facebook, Instagram, Youtube and so on. They all have short domains.
Ideally, I recommend keeping the length of your domain name under 15 letters, maximum 2 words. This will make it easily to remember and prevent spelling mistakes when typing it into a browser.
The last thing you want is to lose traffic because your readers end up visiting someone else’s site.
Another option is to use your name as a domain, for instance petersmith.com. Several bloggers have been successful using this formula.
Use Keywords in Your Domain
Using keywords in your domain will help your readers and the search engines understand what your blog is about.
Combined with high-quality posts and user-friendly website, keywords in your domain can improve your blog’s SEO and rank it higher during searches.
If your desired domain is already taken – be flexible.
Combine a keyword with another word or use synonyms, be creative.
Things to Avoid When Selecting a Domain Name
A few things to avoid when choosing a domain name, most importantly the use of non .com domains.
Other key aspects to highlight are:
- Hyphens. Often associated with spam domains. Can be miss-typed, resulting in lost traffic.
- Numbers and double letters. These will confuse your users and increase the chance of misspelling your domain. Learn2drive.com and Businesssetup.com are prime examples.
- Words with difficult spelling. These are subject to typing errors.
- Combining irrelevant words. Your domain name has to make sense.
If you can’t think of a name that you like, you can use a domain name generator to come up with cool domain name ideas.
Pro Tip: Good, unregistered domains are difficult to come by. If you find one or you already have a name in mind that’s available, act quickly and get it registered before someone else does.
Use my Bluehost link to get your first year domain for free.
2. Select a Web Hosting for Your Blog
The purpose of the web host is to store your website’s files, images and videos, while making the site and its content visible to users. Without web hosting your blog can’t be searched, found and accessed online.
Bluehost is the best web hosting for beginners who’re learning how to start a blog. The shared hosting plan is simple to set up and has a user-friendly dashboard, allowing you to managing your site with no technical knowledge.
Here are some of the reasons why you should choose Bluehost to power your blog:
- Easy to use dashboard. Ideal for non-technical users.
- 24/7 technical support. Perfect for beginners.
- Officially recommended web hosting platform by WordPress.
- 1-click Automatic WordPress Installation.
- Free domain registration for the first year. Saving $15.
- Free SSL certificate. Saving you $15-$50.
- 99% server uptime. Your blog is available online without interruptions.
- Fast speed servers. Quick blog page loading times.
- Advanced security technologies.
- Selection of web hosting plans. Covering every need.
- Built in scalability. Plan upgrades in 1-click.
- 30 days money back guarantee. Piece of mind.
- Starting at only $2.95 per month. Saving 65% on your hosting.
You get a complete hosting solution, providing all the features and tools you need to build and scale a successful blog.
Set up Your Bluehost Account and Register Your Domain
Step 1. Go to Bluehost’s website.
Once on the home page click on the Get Started button to begin.

Step 2. Choose the Web Hosting Plan.
There’s a selection of 4 shared hosting plans you can choose from – Basic, Plus, Choice Plus and Pro.
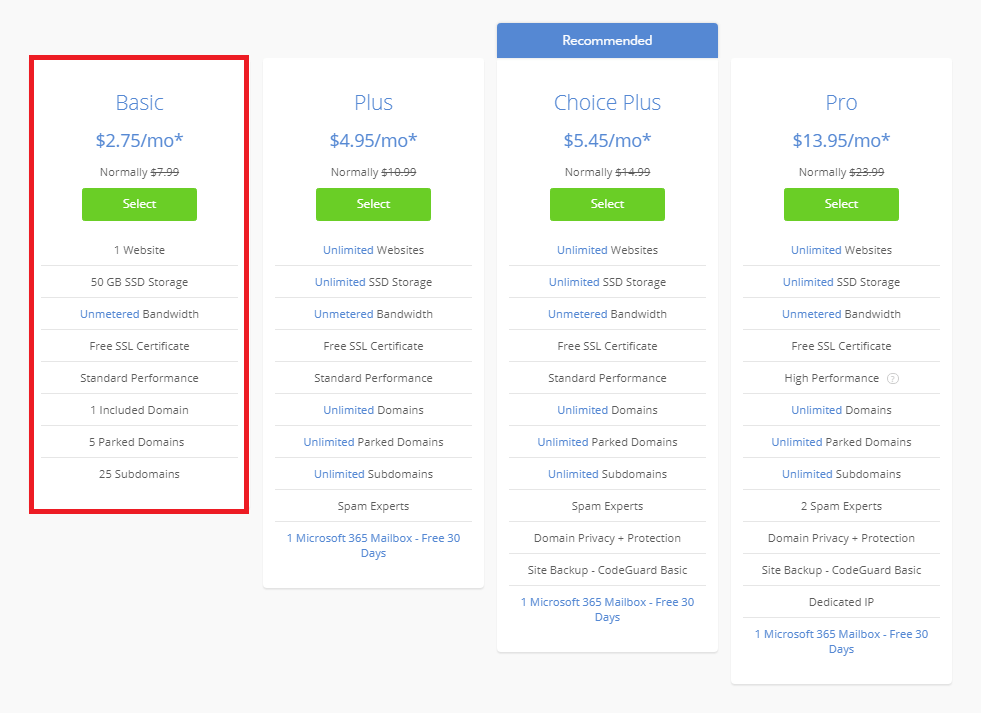
For anyone learning how to start a blog, the best plan is the Basic. It’s the most cost effective option and provides everything you need to get started. You can always upgrade your plan in 1-click once you outgrow it.
Click on the green Select button to proceed.
Step 3. Register Your Domain Name
On this page you have three options.
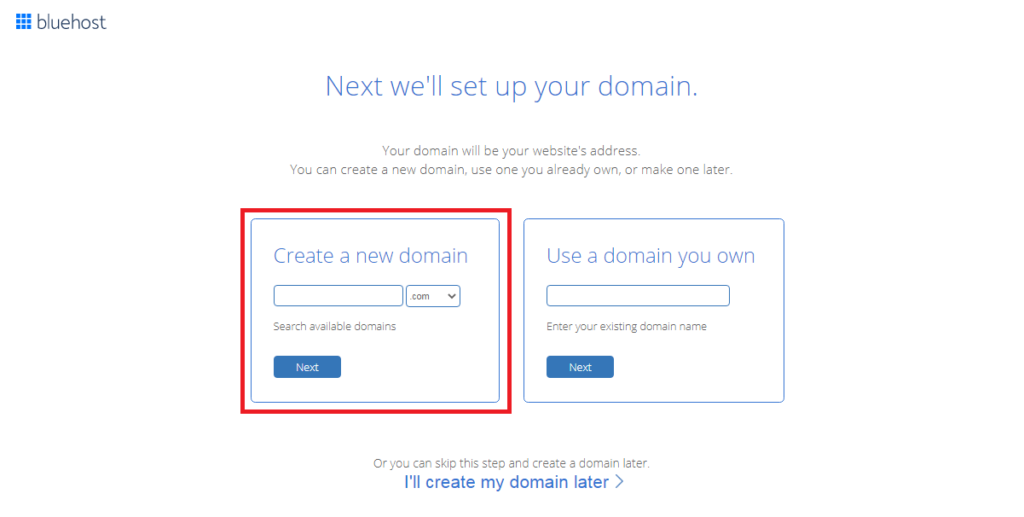
1. Enter your domain name in the Create a New Domain box and click Next, so you can get it registered for free.
2. If you already own a domain, enter it in the Use a Domain You Own field and click Next to proceed.
3. Skip this step and register your domain name later. Just click I’ll Create my Domain Later to continue with the sign up process. You will receive credit to choose a free domain later.
Step 4. Enter Your Details to Complete the Process
Enter your details in the Account Information section, starting with your first and last name, address, phone number and email.
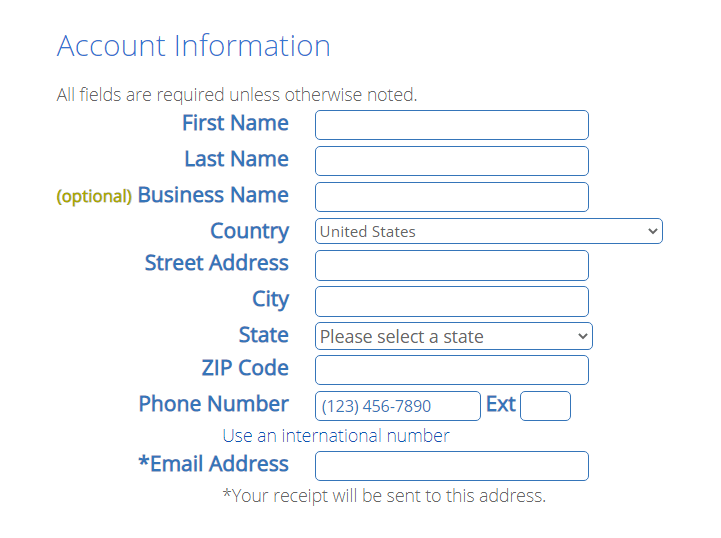
Fill in all fields unless marked as optional and make sure the details are entered correctly.
Then, scroll down to the Package Information section.
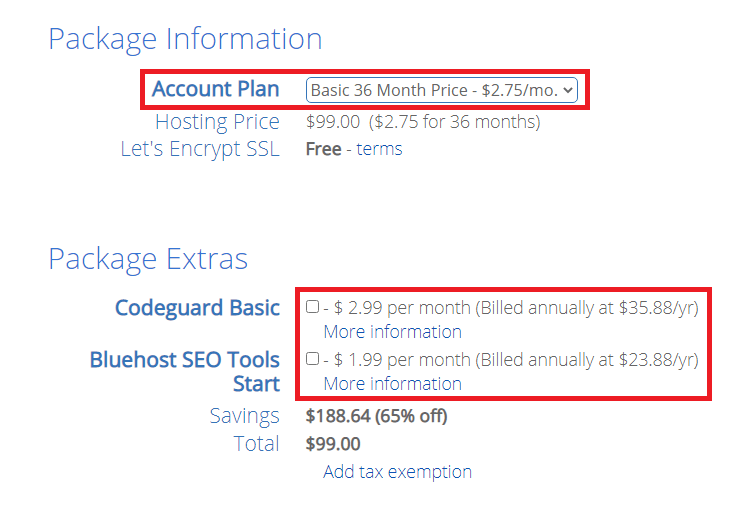
Here you can choose the length of your hosting plan. The options are 12, 24 or 36 months. Keep in mind that longer terms are cheaper. If you’re serious about your blog, the 36 months term is the best option. You’ll get 3 full years of web hosting at 65% discount, saving you $188.64.
There are Package Extras that you can select with your hosting.
Codeguard Basic creates daily backups of your blog and allows 1-click restore. While, Bluehost SEO Tools Start is a search engine optimization tool designed to get your blog online and help it rank.
You can achieve the same results using free WordPress plug-ins; therefore my suggestion is to unselect both extras.
When done, scroll down to the Payment Information section.
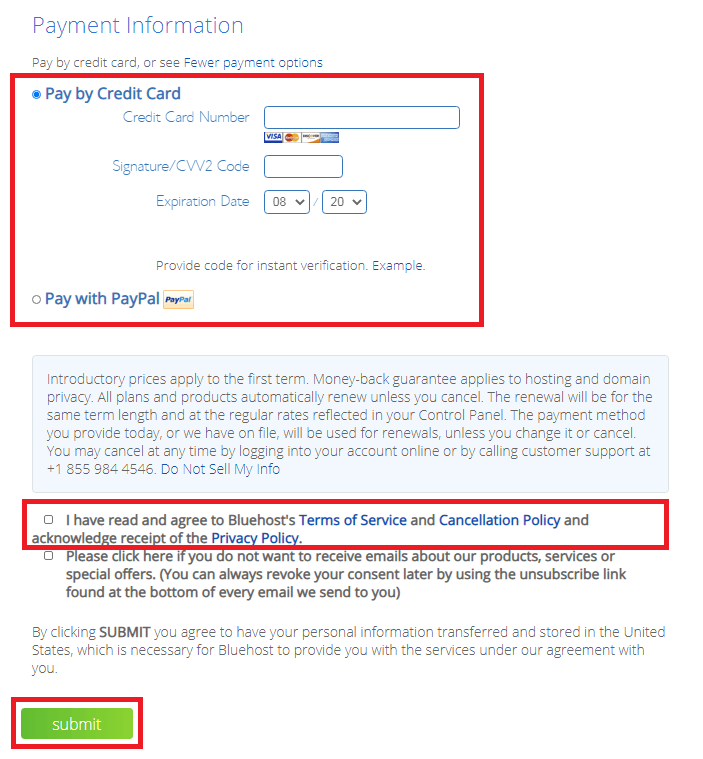
Choose your preferred payment method Debit/Credit Card or PayPal.
Check the box to agree to Bluehost’s Terms of Service and click Submit.
Congratulation! Your web hosting account is now set up.
Step 5. Activate Your Hosting Account and Create a Password
Shortly you’ll receive an email confirmation. In the mean time click on Set Password to create a password for your new account.
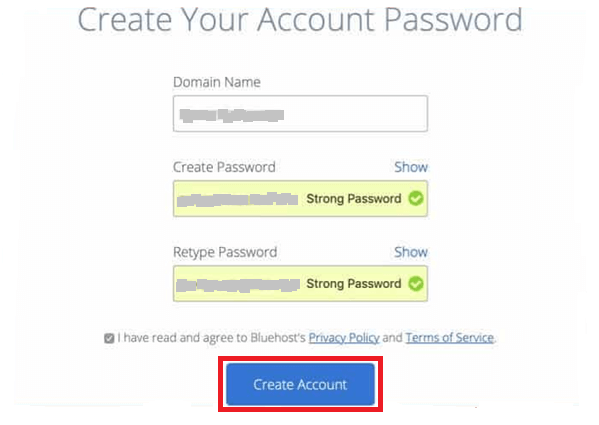
Choose a strong but memorable password to keep your account secure. Then click on Create Account.
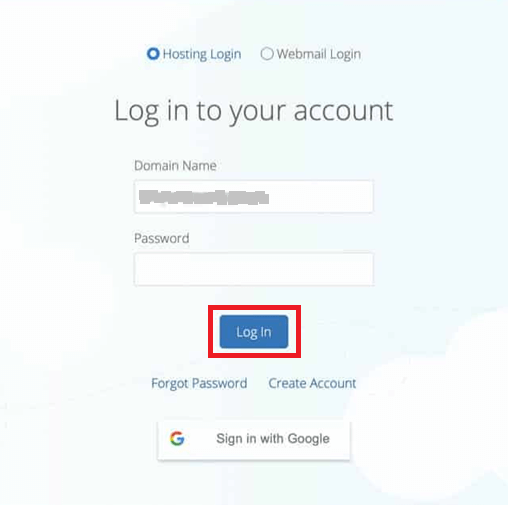
You can now log into your hosting account, using the password you just created.
The setup process is completed!
Now that you have your hosting account set up and your domain name registered, let’s move to the next step of this how to start a blog guide and install your WordPress blogging platform.
3. Install the WordPress Blogging Platform
WordPress is a powerful Content Management System (CMS) that allows you to write, edit, customize, publish and manage your blog posts and pages without the need of any coding knowledge. Designed to be user-friendly and flexible, it appeals to a large number of users.
In fact, a vast 37.3% of all blogs and websites on the internet are created on WordPress, making it the most popular blogging platform.
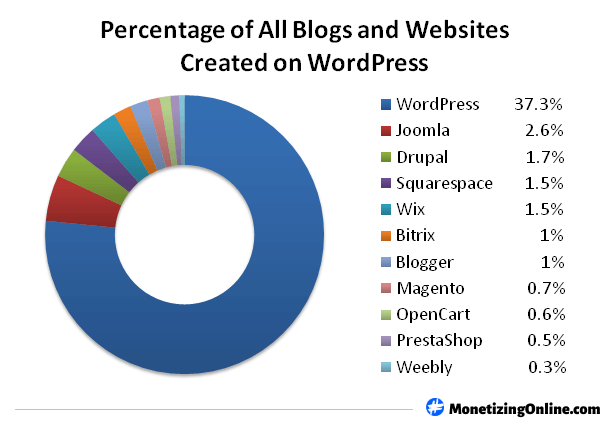
-Data source: w3techs.com
Bloggers are attracted to WordPress as it can be integrated with thousands of free themes and plug-ins, delivering high level of customization and functionality.
WordPress is offered in two versions – WordPress.org and WordPress.com.
Which Blogging Platform to Use?
If you’re new to WordPress and the concept of how to start a blog, then on the surface both platforms seem similar.
However, before you choose which one to use, it is important to understand the differences between the two.
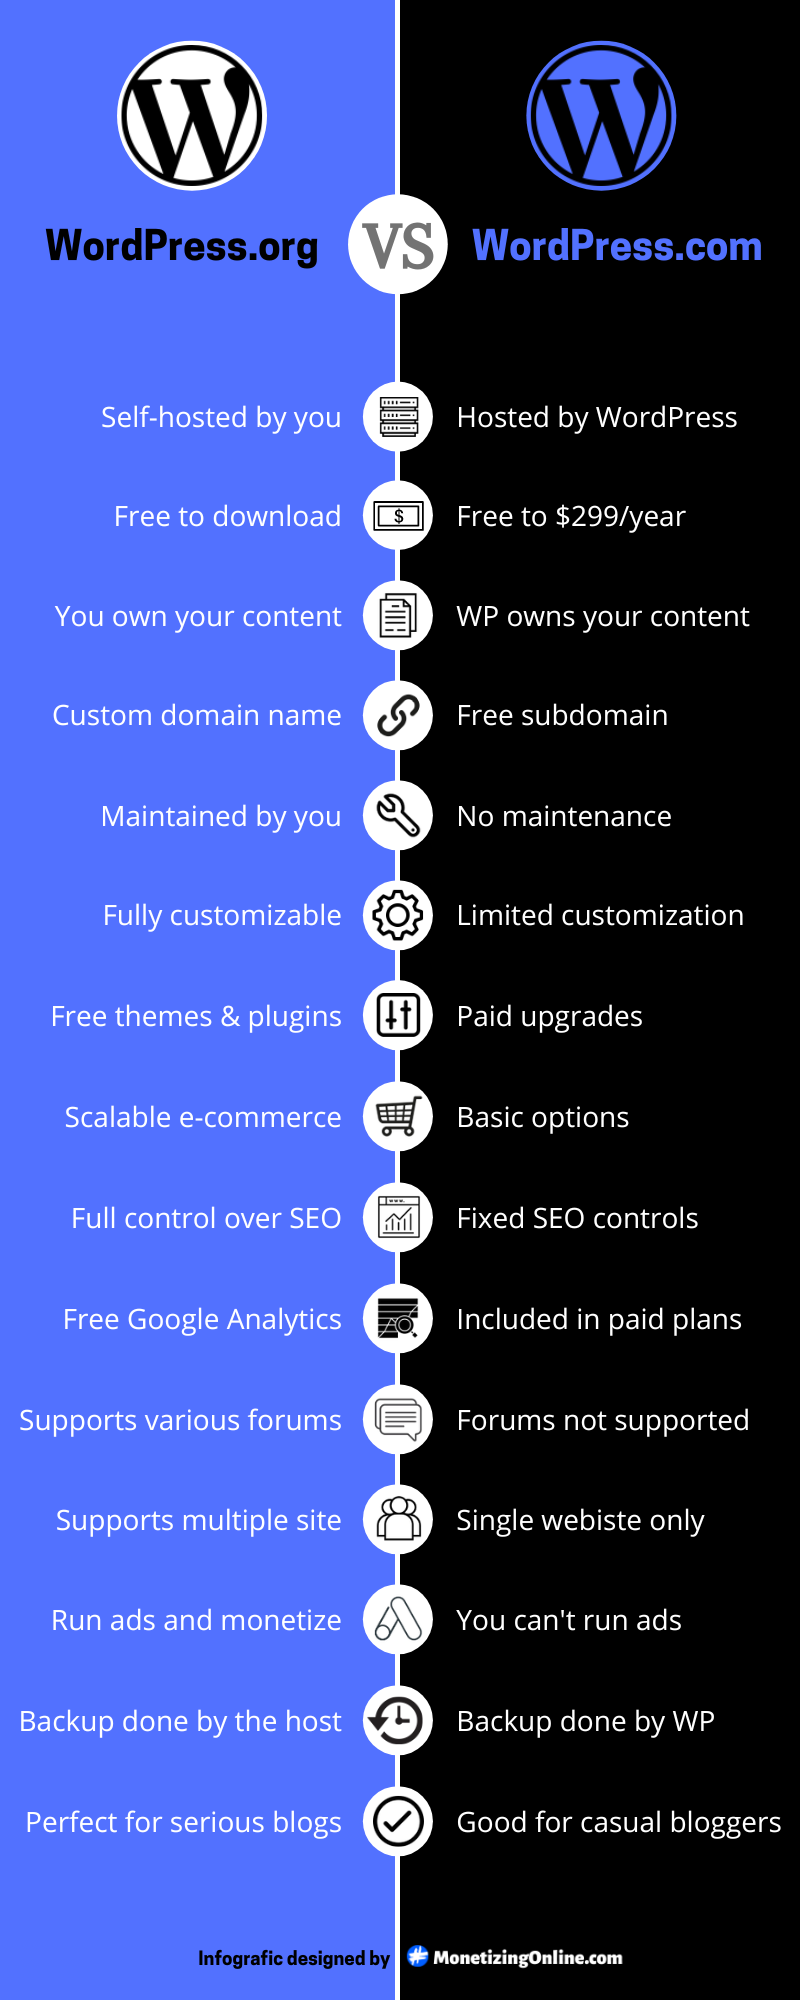
* Feel free to use this infographic for your blog, just provide credit by linking back to this post.
WordPress.com
WordPress.com comes hosted for you. It works on the bases of renting. You select a plan and you pay an annual fee to use the platform to create a blog.
The .com version offers very limited customization and it only gives you access to default features. If you need additional themes and plug-ins you have to pay for a Business plan or higher.
You’re provided with a free sub-domain www.yoursite.wordpress.com. If you want to use a custom domain you have to pay extra. Analytics can be installed but only on the premium plans.
When it comes to content, WordPress.com owns your blog. It also restricts you from running ads and monetizing it.
So, if you want to make money blogging and have full creative control, the answer is WordPress.org.
WordPress.org
WordPress.org on the other hand is a free, self-hosted blogging platform. It works on the bases of ownership. You own your blog, content, domain and hosting.
And since content has become the new currency, as a creator it’s extremely important to own it outright.
The .org version gives you full creative control. It allows you to install any theme or plug-in, making the customization of your blog limitless. And the best part, you can make money with your blog using different revenue streams.
If your priority is to own your blog and monetize its content, the best option without a doubt is WordPress.org.
Get WordPress.org installed in just 1-click with Bluehost, the #1 recommended hosting provider by WordPress.
1. Install WordPress Using Bluehost’s Dashboard
Logging into your Bluehost account dashboard will prompt WordPress to begin installation right away.
The installation will be completed within few seconds and you’ll be presented with several blog themes, including many free themes.
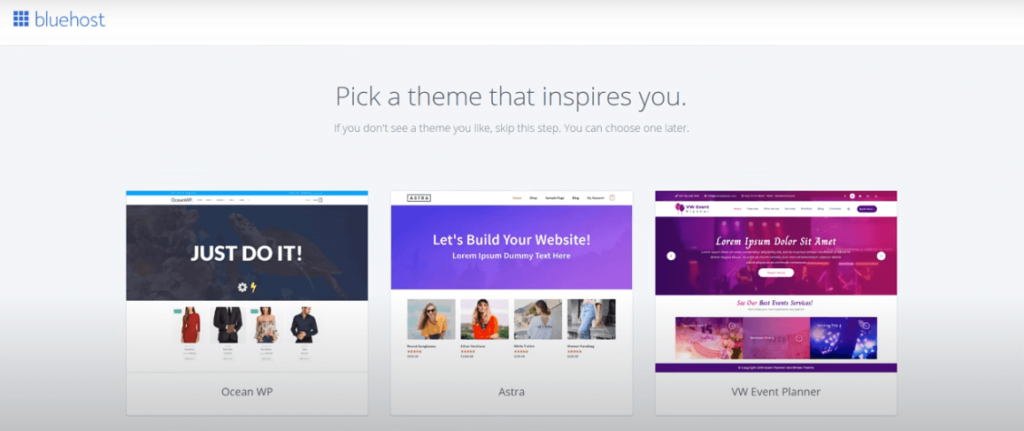
To pick a theme you like, just hover over it and click Use This Theme. You can always switch to a different theme if you change your mind.
You also have the option to skip this step if you don’t like any of the themes you see. Just scroll down to the bottom of the page and click Skip This Step.
You’ll have the chance to choose a theme you like later.
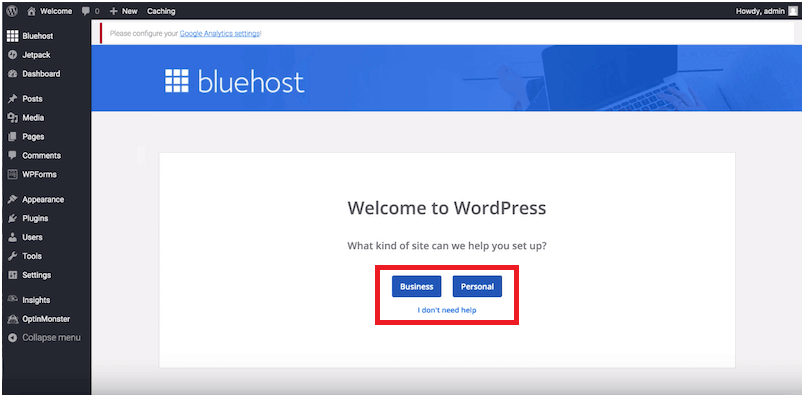
On the following screen click on the Start Building button.

You can choose Business or Personal website and WordPress will navigate you through the set up process.
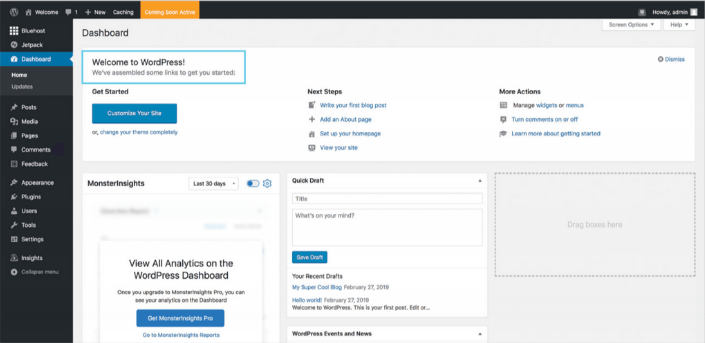
You also have an option I Don’t Need Help, which will take you directly to the WordPress dashboard.
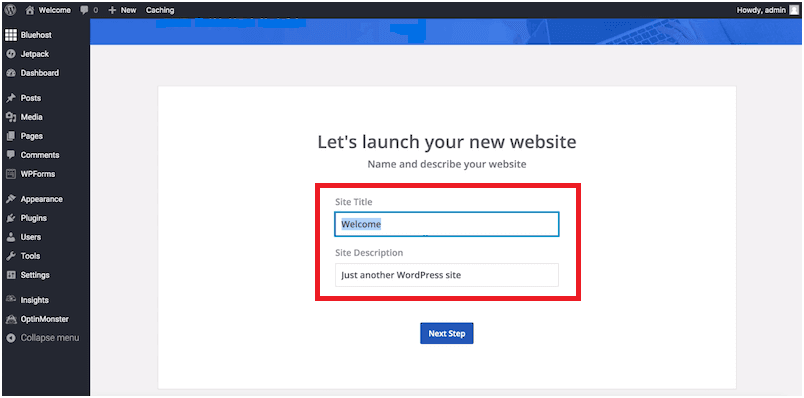
And before you launch your blog you’ll be asked to enter Site Title and Site Description. When done click on Next Step.
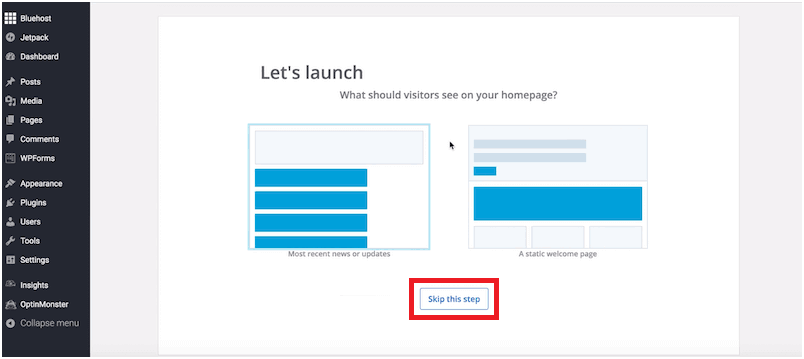
Here, you can choose how to arrange your blog homepage. You can either have your recent blog posts displayed as a feed or you can use a static homepage, customizable with the blog page editor.
You can also Skip This Step all together.
At this stage, it’s essential to go through the different menus and features on the left side of your WordPress dashboard, so you can understand their purpose and function. These’ll help you when it comes to building your blog.
This leads us to the next step of this how to start a blog guide – selecting and uploading your blog theme.
Ready to start your blog? Get 65% discount on your web hosting with Bluehost for just $2.75/month.
2. Choose Your Blog Theme
In WordPress, a theme is a group of files such as graphics, codes and sheet styles, which form the visual design and layout of your website. The majority of themes include:
- Overall design – the look, style, feel and visual appearance of your blog.
- Colour schemes and combinations.
- Site-wide font styles.
- Blog page layouts, also known as templates.
- Styles for posts and blog archives.
- Selection of widgets and widget locations.
- Additional design customization features.
Most themes function like WordPress page builders, allowing you to rearrange the theme’s elements or add to them. With a simple drag-and-drop feature you can create own page designs without any coding.
Things to Consider When Designing Your Blog Theme
These fundamental aspects will help you create a better blog design structure, resulting in a professional look and high-functionality.
Colour Schemes
Color subconsciously affect users behavior and influence them to take action on your blog. In fact, the correct colors can increase conversion by up to 34%.
- Blue instills trust. The most widely used color in web design, it’s associated with trust, reliability and integrity. Great choice for finance, software or technology blogs.
- Green showcases balance and harmony. The color of nature and relaxation, symbolizing growth. It’s an excellent choice for blogs related to travel, organic products or health and well-being.
- Black creates sense of sophistication and luxury. It’s associated with power, secrecy and formality. Due to its neutrality, it’s often used for typography and functional parts of a website.
- White works well with any color. It’s used as a neutral background, allowing other colors to stand out. Used for minimalist designs, it conveys cleanliness and simplicity. The most popular site – Google is mostly white.
- Red, Orange and Yellow capture attention. Use bright colors for your call-to-action (CTA) buttons. These are the highest converting colors drawing a lot of attention and suggesting urgency. Amazon uses orange banner for their limited time offers, making it highly visible and actionable.
Fonts
The primary purpose of the fonts is to help readers understand your blog content. Choose a simple, easy to read font that doesn’t overstrain the eyes. Some of the best fonts are: Open Sans, Oswald, Montserrat, Calibri and Nunito Sans.
Font size
The font size also helps enhance the readers’ experience. To create excellent readability, it’s best to use font size 14 or 16 for the main body and the menus, and larger font sizes for the headings. Ensure the font sizes are proportional.
Overall Design
In the case of overall theme design less is more. It must be simple and user-friendly with conveniently positioned menus and call-to-action (CTA) buttons, allowing for easy blog page navigation. No one wants to deal with complicated menus and pages.
Now that we have outlined the main aspects you need to consider when designing your blog’s theme, it’s time to select your theme and apply the fundamentals.
3. Change the Default Theme of Your Blog
At this point you’ve probably noticed that your blog has a theme already pre-installed, called Twenty Seventeen (your theme may be different).
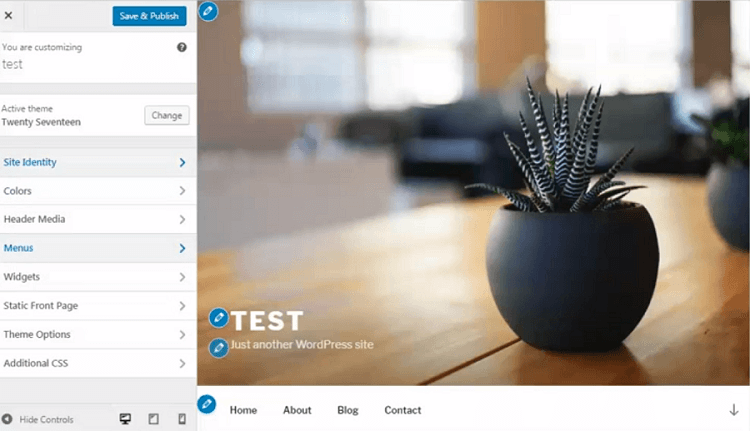
It’s the default WordPress theme. If it doesn’t appeal to you, it can be easily customized using the menus on the left. You can change:
- Site identity. Change blog name, logo, tagline and navigation elements.
- Colors. You can change the colour schemes of the header, footer, blocks, fonts, buttons and menus.
- Menus. You can set primary (header) and footer menus, create new menus, sub-menus and change their position.
- Additional functionality.
- Change theme. Allows you to change the entire theme template.
Before you change it, play around with the menus to get a feel of how to customize a theme and to understand the different editing features.
Now is time to install a new theme for your blog.
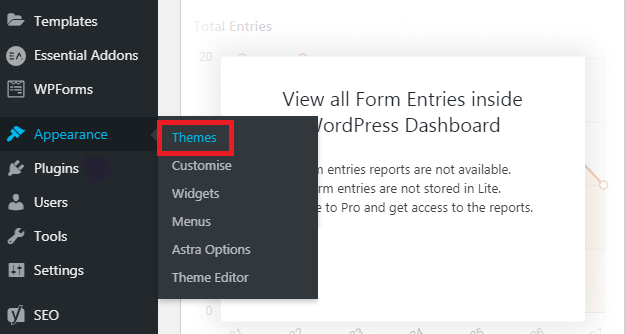
Log into your WordPress account by entering the email and password you created earlier.
When logged in you’ll be taken to your WordPress admin dashboard.
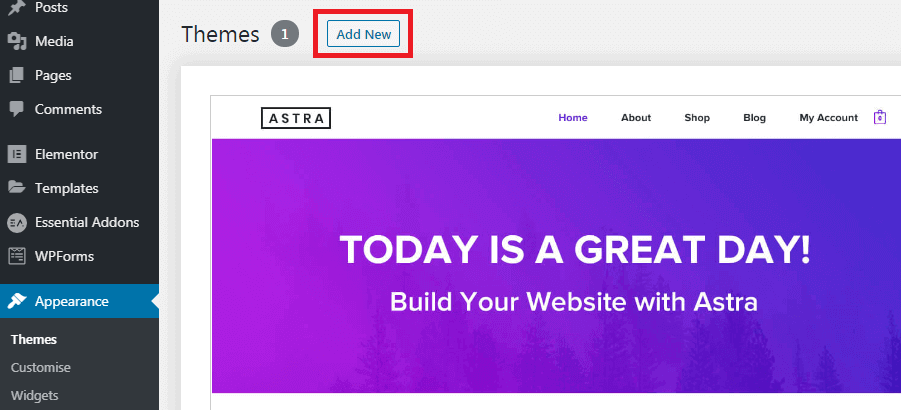
On the left side, hover over the Appearance menu and then click on Themes.
On the next page click on Add New. It will take you to the themes library, where you can search through thousands of incredible free blog themes.
The top bar allows you to browse themes by category – Featured, Popular, Latest and Favourites. Any themes you like can be saved in favorites to compare later.
You have a Feature Filter. You can apply different filters to the subject, layout and features, so you can choose the optimal blog theme.
There’s also a built in Search Themes… feature, which enables you to easily search themes by name.
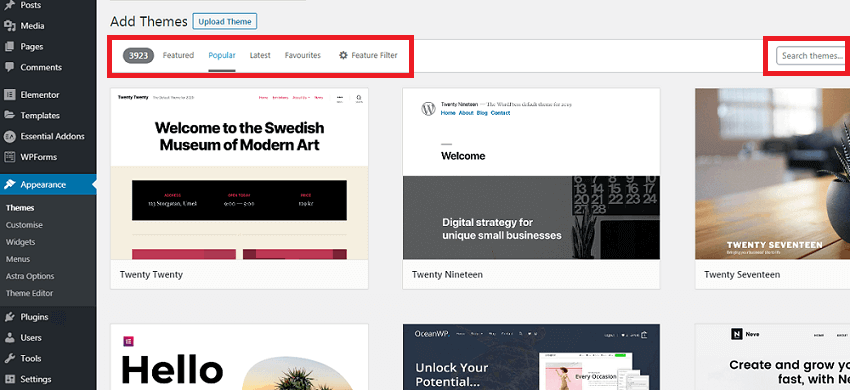
Scroll down and preview the different themes before you settle on the one you want to install.
To Preview any theme, just hover over it and click Details & Preview.
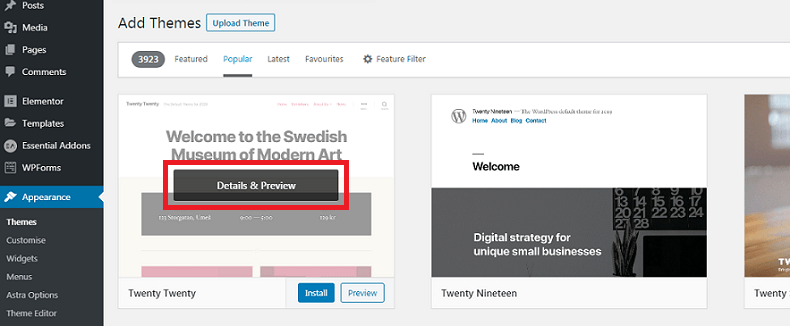
Although, the preview gives you an idea of how your blog design is going to look, most theme aspects can be customized to your liking after you install it.
All the information about the theme is displayed in the left sidebar. You have the name of the theme you’re previewing and details about it.
There’s also rating provided by people already using the blog theme. You can find out what users think of it before you make a final decision and install it.
Pro Tip: Choose a responsive theme optimized for both desktops and mobile devices as more people than ever use mobile devices to browse the internet. Google also favors mobile optimized websites.
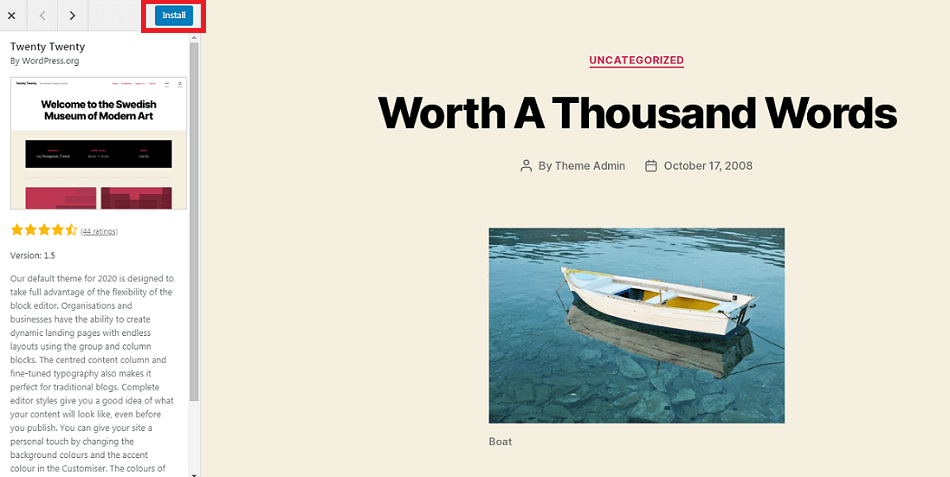
To install the theme you want, simply click on the blue Install button.
Within seconds WordPress will apply the new theme across your entire blog including the home page, blog pages and blog posts.
Congratulations! Your new theme is now installed and you have successfully completed another step of this how to start a blog guide.
Ready to start your blog? Get started with Bluehost for only $2.75/month and get 65% discount.
Now let’s move on to the next step and extend the functionality of your blog using WordPress plugins.
4. Install Your WordPress Plugins
In essence, a plugin is a software component that you can install to add new functions and features to your WordPress blog, allowing endless customization.
There’re thousands of free and premium plugins within the WordPress plugin directory such as SEO, backups, contact forms, email marketing, opt-in forms, security and more.
How to install WordPress plugins?
You can install any plugin directly from your WordPress dashboard. Navigate to the left side menus, hover over Plugins and then click on Add New.
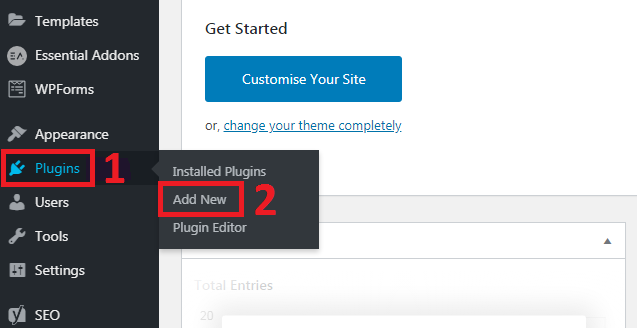
Once in the plugins menu you’ll see the following screen, where you can access thousands of free and premium plugins.
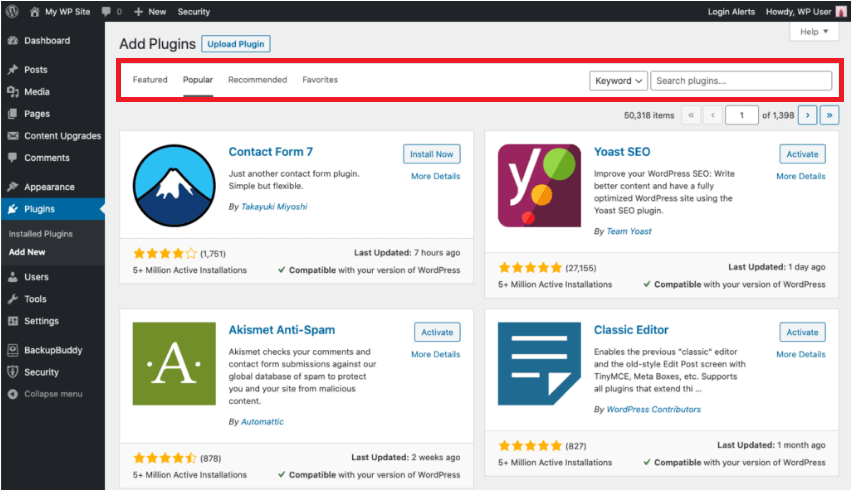
You can browse the various plugins by categories: Featured, Popular and Recommended. In Favorite you can save a list of plugins you want to compare and maybe use in future.
Using the built-in search function, you can easily find any plugin you need.
Plugins can also be uploaded as zip files by clicking on Upload Plugin and following the uploading process.
Although, WordPress offers a wide selection of plugins, don’t install more than 12 on your blog. They can conflict with each other and slow down your site.
However, there’re some must-have plugins, so I have picked the best 4 in the different categories.
4 Must Have Plugins for Every Blogger
Here are the 4 plugins that you need when you’re learning how to start a blog. These are also the ones I personally use.
1. Yoast SEO
Yoast is the best SEO plugin. The plugin offers many free futures including SEO analysis, readability analysis and snippet preview optimized for desktop and mobile results. It also allows you to easily create and manage blog page titles, meta descriptions, and advanced XML sitemaps.
A premium version is available for additional functionality; however the free plugin offers all the features you need to start blogging.
2. Elementor Pro
With over 5 million active installations, Elementor is the leading WordPress website builder plugin. The free version has an intuitive drag-and-drop editor for designing responsive landing pages. To create a truly professional custom blog design, try Elemetor Pro. For only $49 a year it offers advanced design features and extended functionality, helping you reduce the time you spend designing. You can access and modify every part of your blog – header, footer, text, images, buttons, sidebars – directly on the page you are editing. The edit is live and instant, showing any changes in real time.
3. OptinMonster
OptinMonster is the most advanced plugin for creating interactive pop-up, opt-in and email forms. All pop-ups can be individually customized based on the blog page visited, links clicked or user location. Smart features like Exit Intent Pop-ups and OnSite Targeting will help you turn leaving visitors into subscribers. You can start converting your blog’s traffic into sales with OptinMonster for just $9/month.
4. Asset CleanUp
This plugin removes and combines pieces of code that don’t need to be loaded on every page. Asset CleanUp makes the overall code cleaner and lighter, resulting in a faster loading page times.
To ensure that you use the best plugins, before installation check:
- Number of active installations.
- User reviews.
- Compatibility with your version of WordPress.
- When the plugin was last updated.
These metrics will clearly indicate how well a plugin is designed and what to expect in terms of performance.
After extending the functionality of your blog by installing the best plugins, it’s time to cover the next step of this how to start a blog guide and optimize your blog for SEO.
5. Optimize the SEO Settings of Your Blog
Short for Search Engine Optimization, SEO can be defined as: the process of improving the quality of your content, making it easier for search engines like Google to find it, decode it and rank it, based on specific keywords.
The role of SEO is to make your posts visible and searchable, so it can drive organic traffic to your blog.
1. Make Your Blog Visible to Search Engines
The search engine visibility feature built-into WordPress is an option designed to hide your blog from the search engines when it’s under development.
If switched on by accident, your posts may not show during web searches, even if your blog content is perfectly optimized for SEO.
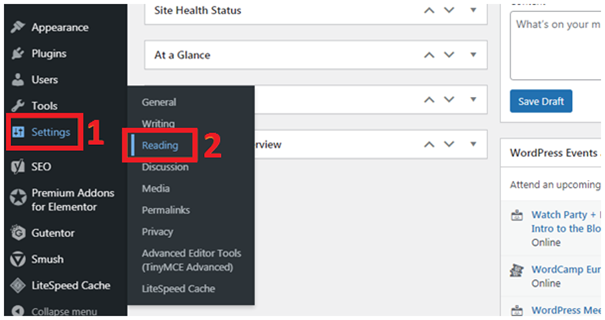
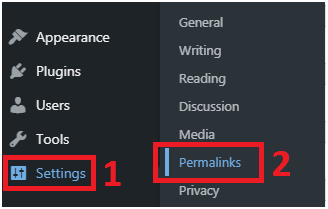
To prevent that from happening, log into your WordPress dashboard and head over to Settings and click on Reading.
Now make sure that the box next to Discourage search engines from indexing this site is unchecked!
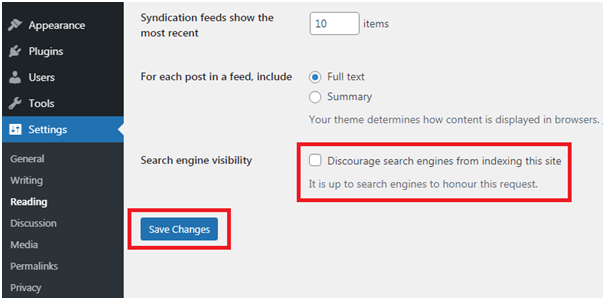
Finally, click on Save Changes to confirm your choice.
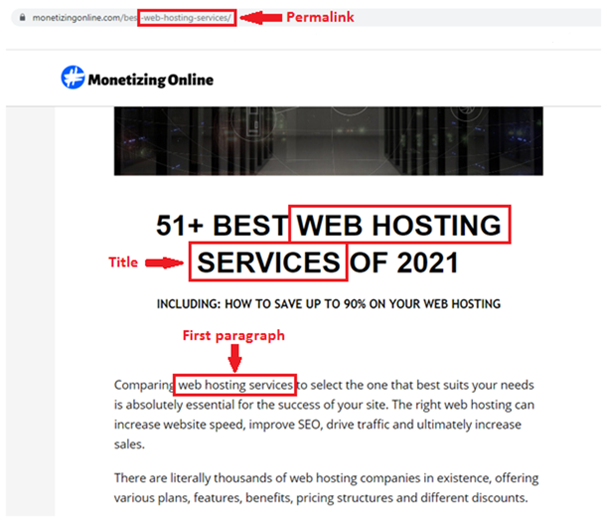
2. Use SEO-Friendly Permalinks
Permalinks are unique URLs used to identify and access individual pages of your blog. Using SEO-friendly permalinks helps search engines and users to understand what your blog content is about.

It’s crucial to define your permalinks format before you start publishing blog posts. Changing the format of existing permalinks will have negative impact on their functionality, leading to loss of traffic and referrals.
WordPress provides six different structure types for your permalinks. To look at the options, go to your WordPress admin dashboard. Then, go to Settings on the left hand side and click on Permalinks.
WordPress will set up your permalinks to Plain, by default. However, the top performing blogs use Post Name or Custom Structure as these are cleaner and considered more SEO-friendly.
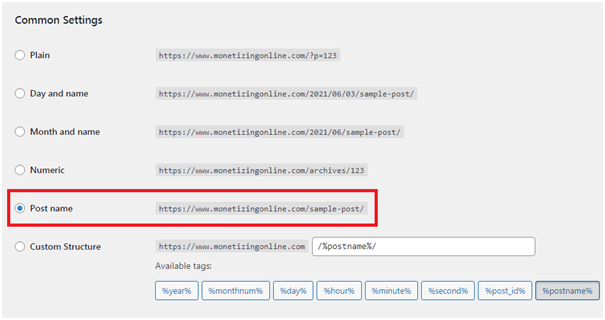
To put this into perspective, here are two examples of different permalink structures:
- https://www.monetizingonline.com/how-to-start-a-blog/
- https://www.monetizingonline.com/?p=10769_73/
The first option gives search engines and users clear indication what the post is about, increasing the chances of the content getting indexed and clicked on during searches.
On the other hand, the second option is not readable, so it confuses both users and search engines.
Select Post Name and click on Save Changes.
To achieve optimal results with your permalinks:
- Keep consistent structure.
- Always include a keyword in your permalinks.
- Use shorter URLs.
- Avoid numbers and dates.
- Use secure HTTPS.
3. Https Sites Get SEO Boost
Google’s algorithm was adjusted to incentivize trustworthy websites, so https sites get SEO boost. To have a https page you need a Secure Sockets Layer (SSL) Certificate.
The SSL Certificate is a small data file that activates a padlock when installed. It provides secure connection between your website and the browser, showing search engines and visitors that your site is verified and trustworthy.

Bluehost provide free SSL certificate with their hosting plans, so you don’t have to pay extra to secure your blog.
4. Google Search Console and Google Analytics
When adding your blog to Google Search Console, make sure to also submit it to Google Analytics. Provided by Google, both tools give great insight into your blog content performance and how it’s perceived by the search engine.
The data reports from Google Search Console and Google Analytics will allow you to gain a deeper understanding about:
- How your blog pages appear in Google search results.
- What terms people are searching for to find your blog.
- Which keywords you’re ranking for.
- How many times individual blog pages are visited.
- The bounce rate or how long a visitor spends on a blog post.
- Country, age, gender of your visitors.
- Issues with your blog.
- Duplicated content.
Use all this feedback to understand what works best and what changes you need to make to your blog. As a result, you can plan your content strategy and optimize SEO to drive contentious improvement to your blog’s performance.
Google Search Console and Google Analytics can be easily integrated with WordPress and SEO plugins like Yoast.
You’re making a lot of progress!
Thus far, you’ve learned how to find a profitable niche, the technical side of how to start a blog, including the process behind building a fully functioning WordPress website.
After laying the foundation, it’s time to creating content for your new blog.
Start your blog today with Bluehost for $2.75/month and save 65% on your hosting plan.
6. Create Content
Creating content for your new blog begins with planning and organizing before you start writing.
1. Keyword Research
Keyword research will help you identify words and phrases that your target audience is searching for. Those are the terms that you want to include in your content, because search engines rank pages that best match the search term and the search intent behind it.
When learning how to start a blog, many new bloggers try to guess what their audience is looking for. However, they’re missing out on a lot of potential readers who’re using different words in their searches.
For example, if you’re starting a travel blog and you want to rank for the term Vacation Villas or Home Away Villas. It makes sense and it’s related to your niche. Without doing keyword research, you can write an article titled 10 Best Vacation Villas to Rent in Miami, assuming it is more appealing to your readers.
Never make assumptions! There’re many powerful keyword research tools available to you. Use them to make an informed decision based on data, so your efforts don’t go to waste.
Here’re the best keyword research tools that you can try:
Google Keyword Planner – performance is restricted, but it’s fee and it’s a good starting point. It also generates alternative keyword ideas based on the term entered.
If we enter the keywords from the example above you’ll understand why trying to rank for the term Vacation Villas isn’t a smart decision.
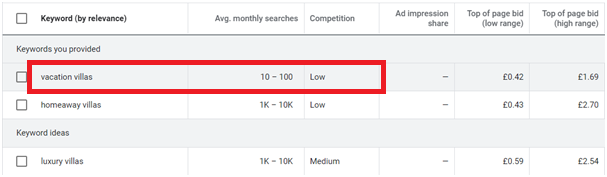
You’ll rank relatively easy for the term as competition is low, but it won’t generate any traffic as the average monthly searches are also very low.
On the other hand, if you focus on Home Away Villas, there isn’t a lot of competition, but the average monthly searches are 100 times higher.
Do you see the difference?
The idea is to find keywords with low/medium competition and high monthly search volume.
If you want to do keyword research like a pro without restrictions and limitations you can try Semrush.
It’s a powerful keyword research tool, offering complete suite for improving SEO and site rankings. You can get full details about any specific keyword, including search volume, keyword difficulty, search trends and more. It also provides information on how to rank for a particular keyword.
To increase your chances of ranking higher in the searches you also have to use variations of the main keyword, known as semantic keywords.
2. Semantic Keywords
Semantic keywords are words and phrases which are related or similar to your main keyword.
If you’re writing a blog post about 10 Best Crypto Trading Platforms, search engines will expect your article to contain related words like:
- Exchange
- Broker
- Maker/taker fees
- Buy/sell
- Trading app
Semantic keywords aren’t what people are directly searching for. However, they allow search engines to better understand your content and rank it, showing it when it matches search intent.
It’s also a good practice to get in the habit of using long-tail keywords to better match search intent and increase your conversation rates.
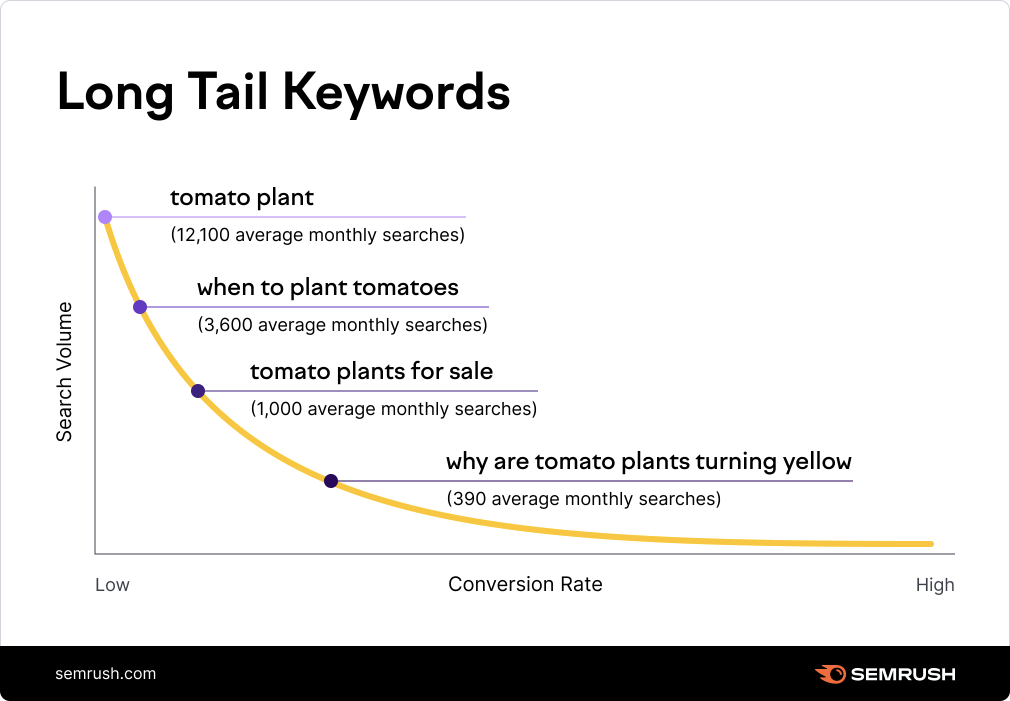
3. Long-Tail Keywords
Long-tail keywords and phrases tend to be longer and more intent-specific than the typical keywords. Contrary to popular belief, the name isn’t related to the length of the actual keyword.
-Source: semrush.com
They’re log-tail keywords because they fall on the long tail of the horizontal axis.
These have lower search volume, but provide higher conversion as the search is more specific, than the head keywords.
For example, if you type into Google the word Camera, the search engine can’t determine what you’re looking for. Is it the definition of the word? Is it information about cameras? Do you want to buy one or what type of camera you’re looking for? So, it might not return the search result you anticipate.
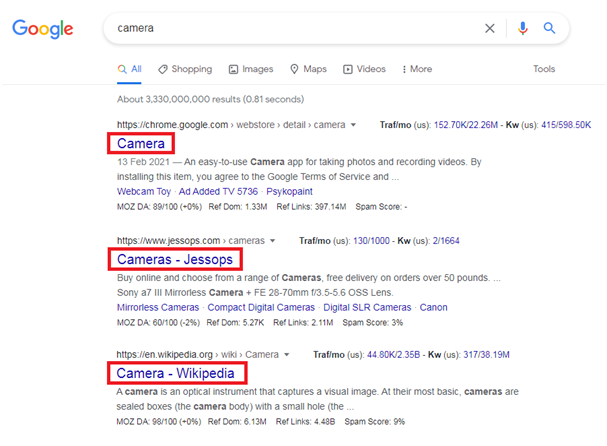
However, if you type Best Cameras for Vloggers, the query is very specific. It indicates to the search engines that you want to compare vlogging cameras and you’re likely to buy one. To match your search intent, only websites containing lists of the best vlogging cameras will be displayed.

By targeting long-tail keywords and semantic keywords, you can start ranking organically for hundreds of other keyword variations.
When you’re learning how to start a blog, you can use the SEMrush Keyword Magic Tool to easily find various long-tail and related keywords. These can be ideal for your blog post headings and sub headings.
If your target keyword is Best Vlogging Cameras, blog post headings could include:
- What are the most popular vlogging cameras?
- How to choose a vlogging camera for beginners?
- Best cameras for youtube vloggers.
- Best cheap vlogging equipment.
- Can you use a smartphone for vlogging?
Always select variations of your target keyword that have good search volume and match search intent.
4. Adding Keywords to Your Content
Each blog post you publish should target one main keyword.
To optimize the article for SEO:
- Add the target keyword phrase in your URL (permalink).
- Place the keyword in the title of your blog post.
- Include the keyword in the first paragraph of the content, making sure that it flows naturally.
- Add the keyword throughout the content. For best results, use it once for every 250 words that you write. However, avoid loading the text with keywords. This is known as “keyword stuffing” and it could have negative impact on your site. Google sees it as an attempt to manipulate your rankings in the search results.
- Include the keyword in your meta description.
After completing your keyword research and selecting medium volume-low competition and very high volume-high competition keywords, it’s time to start creating content around these keywords.
This guide on how to start a blog won’t be complete without covering the writing process of your first blog post.
5. Write and Publish Your First Blog Post
Writing a blog post isn’t difficult when you have done your keyword research and have a clear structure to follow.
The practical tips I’ll share with you about writing content are generic and can work for any blog niche or topic. These are essential elements that’ll help you structure and improve your content, so you can keep your audience engaged.
Blog Post Structure
There’re many different blog post formats that you can come across:
- Comparison lists – Top 10 Plugins for WordPress Bloggers
- Pillar content – long-form, in-depth, engaging articles, serving as a foundation on which the rest of your content is built and links to.
- What-is posts – What is The Best Blogging Platform?
- How-to guides – How to Start a Blog
There’re other post styles; however you only need to focus on these four types of informational and transactional posts since they’ll generate the most income and traffic.
Your blog posts need to have clearly defined introduction, main body and conclusion. Having structure will make the content easier for you to write and for the audience to read. Here is a format you can use:
1. Blog post title.
2. Introduction.
3. Main body of the blog post.
4. Solve a problem and offer practical advice.
5. Call To Action (CTA).
6. Conclusion.
7. Frequently Asked Questions (FAQ).
Although, you don’t have to be a professional copywriter to learn how to start a blog, it is useful to keep good grammar, spelling and punctuation when writing. If in doubt, you can always use Grammarly to improve your writing skills. It’s my go to tool for proofreading my content, so it’s clear, concise and grammatically correct.
You can also take a look at my list of best grammar checkers to use when creating content.
Additional tips for writing blog content include:
- Use 14-16 font size and always use black font.
- Write shorter paragraphs, 3 to 5 sentences.
- Use 1.5 line spacing and add space after each paragraph, leaving enough white space around the text.
- Format the blog headings. Apply H1 tags once per blog post and only to the title. Use H2 tags for the main headings and H3 tags for the sub-headings. This helps search engines classify the importance of your content.
- Create high-quality textual and visual content and present it professionally.
- Write in a conversational manner and keep in mind that majority of your readers are probably beginners.
- Avoid displaying multiple ads as it could annoy your audience.
1. Blog Post Title
A lot of your blogging success relies on your blog post title as it’s the first thing a reader sees. So, it’s important to make it catchy and clickable. To achieve this, use the following proven formula for generating headlines:
Odd number x Superlative x Target Keyword x Current Year x (Content Hint)
7 Best Content Marketing Hacks in 2025 (Actionable)
- Odd numbers – headlines with odd numbers attract 20% more clicks.
- Superlative – readers are naturally attracted to best, easiest, quickest way of doing something.
- Target keyword – helps search engines identify and rank your content.
- Current year – instantly tells the reader the information is up to date. Don’t forget to update the years in your content.
- Brackets – summaries what readers will get out of the article before they even click on it (Ranked), (Latest), (Step-by-Step), (Examples).
Google only displays the first 70 characters during SERPs, cutting the rest, so don’t exceed the limit.
A well thought out blog title will get readers to click on it; however it’s the opening paragraph that’ll get them to read the rest of the article.
2. Introduction
As a blogger you shouldn’t be focusing only on clicks and visits, because 55.2% of all website visitors navigate away from a page in 15 seconds. Instead, your goal should be grabbing the attention of your audience and connecting with them, starting with the introduction.
The opening paragraph is the first thing they’ll read, so make it count.
Your introduction needs to be 100-250 words, written in a compelling way.
Everyone approaches the introduction differently. Often times I find it easier to craft the body of the article first and then write the introduction. Have fun with it; see what works best for you.
3. Main Body
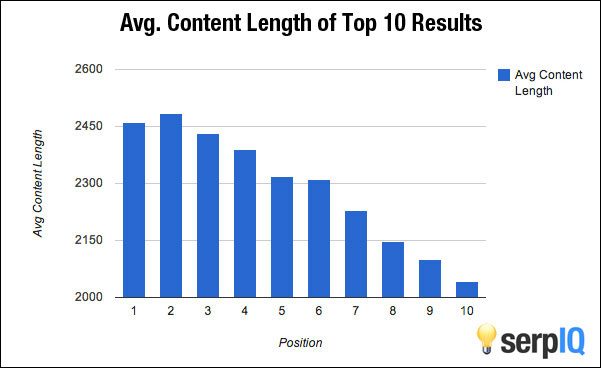
The main body of your posts should be long-form, high-quality content, where you unfold the topic. While articles of 2000+ words rank higher on search engines, avoid including irrelevant content just to extend the word count.
Write in a conversational manner and always focus on creating in-depth content that offers value to your readers. A successful blog solves a problem for the audience by providing clear and actionable steps.
Readers lose interest quickly when presented with big blocks of text. Instead, create descriptive headings and sub-headings to break big pieces of content into smaller sections, making them easy to read.
Many people don’t read the full articles; they just scan through the text. To accommodate them use short paragraphs, bullet points, lists and visuals.
Images, videos and infographics cater to visual learners. But, never download images directly from Google before checking if these are free to use.
You can create your own images, using the templates in Canva Pro.
Visit Pixabay or Unsplash if you are looking for free images that don’t require attribution. Either way, only use high-quality, clear images no larger than 800-850 pixels.
Use explainer images when creating step-by-step guides to support the text and present it visually. Add charts and diagrams when covering complex topics. They’re easier to understand and make your blog post stand out.
Extra tips to consider when using visuals:
- Add a featured image to every bog post.
- Add headline on the featured image to give it meaning, using Canva.
- Don’t go overboard with images. Generally, 1 per every 150-200 words.
- Each image must enhance the text, support your point or add value.
- Always insert alt image text instead of image187_1129.
4. Conclusion
Keep the conclusion short. A great way to conclude your article is to summarize the key takeaways from it and express your own opinion.
Use the opportunity to involve your audience by asking them to take action on your blog. Activity has positive impact on SEO:
- Ask a question – start a discussion in the comments.
- Include call-to-action (CTA) – promote your product or service, provide a special offer or ask the readers to subscribe to your email newsletter.
- Provide links to related blog posts – you can link to your own articles.
- Direct readers to social media – ask them to follow you and share your content on Instagram, Facebook, Twitter or Pinterest.
Now, as part of this how to start a blog guide let’s write and publish your first blog post.
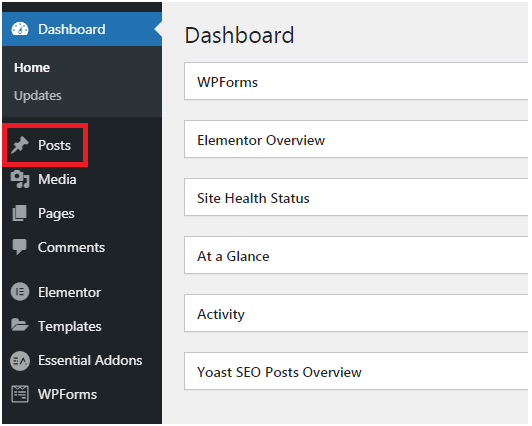
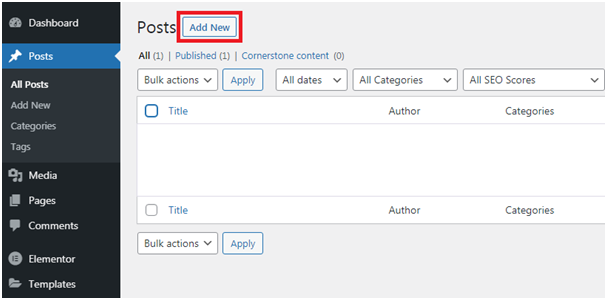
Head over to your WordPress dashboard.
Then click on Posts in the left sidebar.
Then click on Add New.
Now, you’ll be taken to the classic blog post editor. I personally prefer using the Advanced Editor Tools, because it extends and enhances the classic editor.
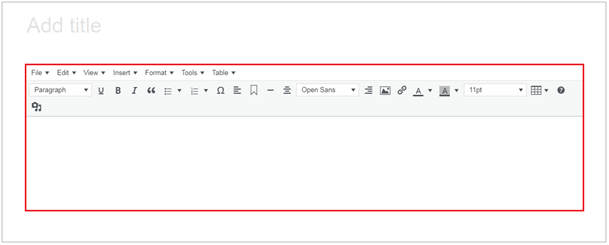
It’s a versatile editor that shares similarities with Microsoft Word, giving you flexibility and additional functionality, such as:
- Inserting H1, H2, H3, H4 headings and paragraphs.
- Selection of fonts and font sizes to choose from.
- Bold, Italic and Underlined
- Bullet points and lists.
- Choice of special characters.
- Text alignment options – left, right, center and justify.
- Inserting images and media.
- Adding clickable links and highlighting them within the text.
- Creating tables and many other options that help you write your blog posts more efficiently.
When creating your blog posts, keep in mind the SEO and keyword research tips that we’ve covered so far.
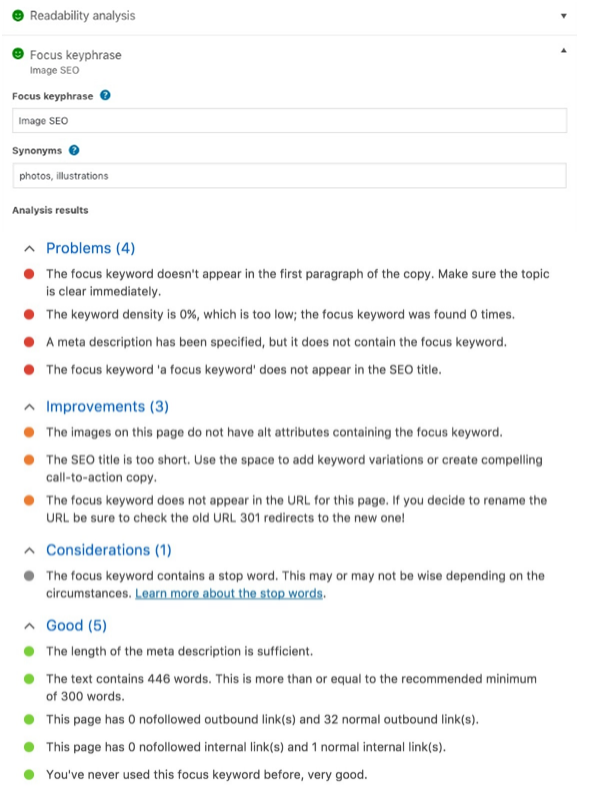
Once the article is completed, enter your focus keyword, title, slug and meta description in the Yoast plugin.
The SEO analysis will give you instant results on how your post may perform during online searches based on your selected keyword. It’ll highlight problem areas in red, areas which need improvement in amber and it’ll suggest best practices. Try to achieve 85% green feedback.
The preview section allows you to see how your blog article will appear during searches. If you’re happy with the result click the publish button.
Congrats you’ve successfully published your first blog post!
Once it is live, go to Google Search Console and submit it for indexing. Don’t worry if it doesn’t appear on Google immediately. New blog posts can take a few days to be crawled and show during searches.
Besides blog posts, let see what static pages you need to add to your blog.
Supporting Blog Pages
Supporting blog pages such as Home, About, Post Grid and Contact Page will make you blog complete. Including these pages to the top navigation menu will help visitors to easily navigate through it.
You can create those static pages with the Elementor plugin. The drag-and-drop website builder allows you to design stunning, high-quality web pages. Be creative, but keep things simple, no one wants to browse through complicated sites.
Home Page
The home page has a very particular role – to help the visitors understand right away what your blog is all about.
Keep the information on the page concise and focused on your niche.
If you’re learning how to start a blog, but you want to achieve optimal results when designing your home page, consider adding the following elements:
- A heading and subheading over a high-quality image.
- Call to Action (CTA) button sending visitors to an important post or page.
- Email opt-in form, where readers can subscribe to your blog, so you can build your email list.
- A section to display your latest or most read blog posts.
- Internal content links pointing to your best blog posts. Internal links allow users to easily navigate your site, but are also vital for SEO.
About Page
There are a lot of misconceptions out there as to what an About Page should include and it’s often overlooked.
Use the opportunity to introduce yourself. Tell your readers who you’re and share your background and even failures. Reveal your fears and weaknesses. A lot of people will relate to your story, creating a deeper connection. This is your target audience and your ideal clients.
But to build authority and trust with your About Page, you also have to provide value. Think about how you can help your target audience accomplish their goals. Determine their pain point and offer solution. Present the solution that helped you overcome the same struggles your readers are going though.
Don’t forget to add a call-to-action.
If you struggle with ideas, visit the About Page of the top bloggers within your niche to get inspiration. You can also head over to My Story to check it out.
Post Grid Page
Creating a Post Grid Page is a great way to visually showcase your content. It also allows you to keep your blog posts organised as you blog content grows.
You can classify your posts by blog title, author name or category within the grid. Visitors can easily see the latest or older content in one panel, helping them quickly find what they’re looking for.
Contact Page
The purpose of this page is to provide your blog visitors with information on how to contact you. Here you can include email, phone number and contact form. You can also provide links to social media accounts as an alternative way of contact.
After publishing your first blog post and building supporting pages, you have a complete and fully functioning blog.
Now, it’s time to focus on another integral element of how to start a blog – creating a content calendar for your future blog posts.
If you haven’t already, start your blog today with Bluehost and get 65% discount on your hosting with my link.
Blog Content Calendar
A blog content calendar is a visual way of keeping your ideas organized, while laying out your long term content strategy. It’ll help you stay on track and produce a consistent streamline of content.
When designing your content calendar consider:
- What tools to use? You can start with Excel or Google Docs for free. Popular paid options are Monday, Airtable or Asana. I prefer excel as it gives me full control over how I plan my future content and what I track.
- What metrics you want to track? My spreadsheets include:
- Blog post title.
- Target keyword.
- Monthly search volume.
- Keyword Difficulty.
- Article length.
- Content status (In progress, first draft, final draft, review, approved).
- Publishing date.
- How frequently can you publish content? Daily, weekly or monthly.
- Who is the assigned author? Are you going to write the content yourself or are you going to outsource it to someone else?
Here are the steps I take to plan, create and promote my posts, in order to drive traffic and earn income:
1. First, I do keyword research on a term I aim to rank for. I also perform competitor research to determine how long my article should be.
2. Then, I start outlining the content. If you plan to outsource the writing of the post, send the outline to your writer to use it as a guideline.
3. When the post is drafted I edit it to ensure it’s in-depth and it solves the problem of my audience.
4. Next, I publish the blog post. It takes time to get traffic to new posts, so don’t over think it.
5. Now I add my affiliate links, so I don’t miss out on any revenue.
6. Then, to get my content to rank in searches, I focus on building high-quality backlinks (explained below). Once the article appears on the top 5 pages on Google I go back and revise the content. I increase its length and add semantic keywords related to the head keyword.
7. Finally, I repeatedly update the content and keep building inbound links to sustain my rankings and drive further traffic.
These steps can help you improve your planning process, which is crucial for producing more posts in a short time frame. With this approach you can build a pipeline of content ideas for future posts and stay on track with deadlines.
Other elements to keep in mind when developing your content strategy when you’re in the learning process of how to start a blog:
1. Know Your Target Audience
In blogging, target audience is a specific group of readers who share similar characteristics. These people are interested in your content and find it useful. Your goal is to reach them though your articles since they’re your ideal clients.
To define your target audience consider some of these metrics:
- Gender
- Age bracket
- Education level
- Background
- Interests
- Consumption habits
- Pain point or desires
If your blog is dedicated to training and fitness your target audience could be: men and women age 21 – 45, working in an office environment, interested in staying fit and healthy, passionate about training and fitness.
Writing content for someone who isn’t interested in physical activities will be waste of your time and effort and you won’t generate any revenue.
2. Competitive Research and Analysis
Understanding the fundamentals of the best performing blogs in your niche is just as important as knowing your target audience.
It gives you insight into their content strategy and performance, including:
- Type of posts they published.
- Keywords they rank for.
- Number of backlinks they get.
- Length of their articles.
- What pictures, videos and infographics they use.
- Their domain rating.
- What affiliate programs they promote.
- How much traffic they’re getting from social media channels.
- Inspiration and ideas about future blog posts.
Use the findings to your advantage and adopt some of the tactics which are in line with the strategy and goals of your blog.
You can use Google as a starting point for your research. But if you want to do in-depth competitor analysis you can try SEMrush. It offers more than 30 tools for tracking metrics like SEO, keywords, PPC and content analysis.
Competitor research will also provide some industry wide benefits like:
- Recognizing emerging trends within your niche.
- Identifying gaps.
- Outlining areas for improvement.
- Establishing a long-term development and growth strategy.
You will gain a deeper understanding of the areas where you need to focus your resources and attention in order to outperform the competition.
3. Solve the Pain Point of Your Audience
In the context of blogging, a pain point is a problem your audience is facing. Identify the pain point and offer solution based content.
For example, if your blog is focused on helping people who encounter financial difficulties you need to cover topics like: money management, saving and investing. Include keywords such as: savings, budgeting, mortgages, banking, investments, taxation, insurance and so on that match the search intent of your readers and add affiliate links to the blog posts to generate revenue.
Understanding your audience and their pain point will position you as an expert in the niche and your content as the relevant solution.
The fastest way to drive traffic to your articles is by building backlinks.
And this is what we’ll cover in the last chapter of this how to start a blog guide.
Start your blog for just $2.95/month with Bluehost.
7. Building Backlinks to Your Blog
Despite the fact that there are 200 Google ranking factors that we know about, backlinks are considered as the most important element.
Backlinks or inbound links are created when one website includes a hyperlink in their content to another site. If a website mentions you in an article, you receive a backlink.
If backlinks from multiple trustworthy websites are pointing to your blog, this’s signalling to Google that your content is high-quality and worth linking to. As a result of the value and page authority the links pass onto your pages, they become more visible and start ranking higher during web searches.
Keep in mind that the Google Algorithm doesn’t favor links from irrelevant, low-authority or potentially spammy websites.
For example:
If you run a Fitness and Wellbeing blog, but you get backlinks from fashion or gaming sites, the chances are these could cause more harm that help your page rankings.
But how do you build links from relevant, authoritative, trustworthy and popular sources?
Generally speaking, you can use three different approaches:
1.Create backlinks – This is done by participating in forum discussions, leaving blog comments or submitting your URL to business directories.
2.Earn backlinks – when people find your content through search engines, social media platforms or through shares and choose to link to it.
3. Build backlinks – the process involves reaching out to bloggers, website owners, editors or publishers and asking them to link to your page. You’ll need a clear value proposition to succeed with this approach. This is where link-building strategies come into play.
Here’re some tried and tested tactics to use when building backlinks:
1. Guest Blogging
Guest blogging is one of the best strategies for building backlinks. It’s also a great way to connect with other bloggers, site owners and content creators in your niche and build lasting relationships.
For this approach to work, it’s important to focus on providing value for the other party, instead of focusing on what you’ll gain in the process.
To identify sites that offer guest posting opportunities visit blogging networks and communities like: BloggerLinkUp or MyBlogGuest. Be strategic and reach out only to relevant blogs with high domain authority. Use SEMrush Backlink Analysis Tools to determine the site’s authority score and backlink profile.
You can also perform Google searches for the following terms:
[your niche] + websites accepting guest posts
[your niche] + write for us
[your niche] + blog post contribution
Once you collect a list of websites check their contact or LinkedIn page, or use tools like Hunter.io to find a name and email address to reach out to.
Many sites will respond to you. The ones interested in a guest post will provide guidelines and instructions on what posts they’re looking for. Following the format precisely to create high-quality, SEO optimized content that doesn’t exist on their site.
2. Link-Worthy Content
Craft long-form, fresh new content that offers details information and value, so it makes people want to link to it. Creating infographics or other visual assets is another great way to get people to share your content and link back to you.
3. Use HARO (Help a Reporter Out)
HARO is an online platform connecting publishers and journalists, looking for valuable content, with external sources. The companies using HARO, include: Wall Street Journal (WSJ), Reuters, The New York Times, Fox News and many more. These media outlets have high-domain authority, so getting a backlink from them is like striking gold.
4. Outdated Resources
Identify sites that contain outdated article. Then enter the URLs into Semrush to see who is linking to these pages. Reach out to them, mentioning that the content they’re linking to is outdated and propose that your post could make a great replacement.
Below is an email template that you can use for your outreach:
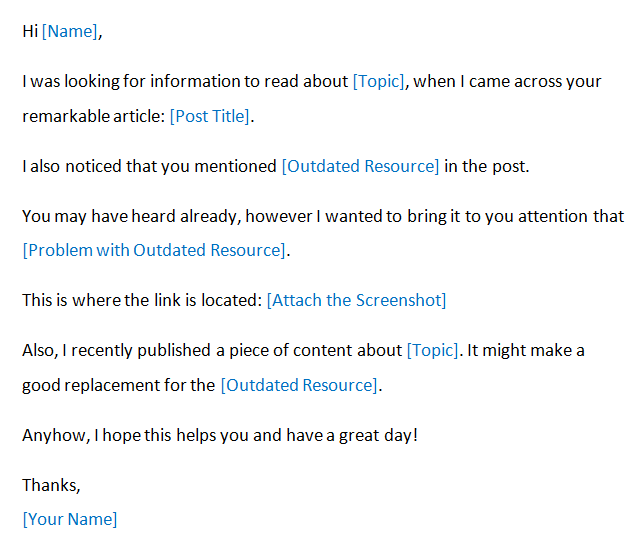
Ultimately, your link building efforts will help you build credibility within your niche, an audience and sustainable, revenue generating blogging business.
You can check the Best Ways to Build Backlinks, if you want to explore other ways of getting backlinks and promote your blog.
5. Promote Your Content Using Email Marketing
Email marketing is a powerful, cost-efficient tool, combining direct and digital marketing. It’s an effective way to reach your current and potential readers to promote your blog, drive traffic and revenue.
However, building a solid email subscriber list is crucial for the success of email marketing.
How do you collect an email list?
The best way to build an email list is by using the help of some external tools and software that will simplify the process:
1. Create a lead magnet. A free product or service you offer in exchange for subscription to your email list. A lead magnet can be: free consultation, course, e-book, sample or newsletters.
2. Include a sign up form on your blog. OptinMonster is the best email opt-in tool you can get. It makes collecting email addresses and generating subscribers easier than ever. You can also add sign up forms in the blog posts, side bar opt-ins or exit-intent pop ups.
3. Automate your email marketing campaigns. Set up a targeted email or series of emails and let the automation do the work. ConvertKit is most powerful email marketing automation software out there. The tool is fully customizable and comes with many great features:
- Professionally designed email templates without branding.
- 9% delivery rate (your emails won’t end up in spam folders).
- Adding emails to or changing your email series at any time.
- Create campaigns on actions taken inside the emails.
- Performance stats based on every email you send.
Keep in mind that you don’t need fancy email designs with many images. Basic text emails look more professional and will bring in the most income for your blog. You can include, in a subtle way, affiliate links or links to related articles in the body of your emails.
These email marketing tips will help you maximize the number of returning blog visitors and convert them into paying clients.
This how to start a blog guide is nearly over.
You’ve learned a lot and you’re now equipped with the information you need to turn your new blog into a profitable, income generating online business.
Remember, understanding how to start a blog is a valuable asset, but to be a successful blogger you need to apply the knowledge, so take action.
Now, over to you!
If you haven’t already, launch your blog today with Bluehost for $2.95/month.
Thanks.
Automation: the New Era of Technology
Automation and outsourcing are the best ways to scale your online business faster 🙂
Thank you Kathi, I’m glad you found the post helpful 🙂
I’m thoroughly enjoying your blog. I too am an aspiring blogger but I’m still new to everything.
Do you have any recommendations for rookie blog writers?
I’d genuinely appreciate it.
Venus, read the full blog post, it covers everything you need to know as a beginner as well as how to build and monetize your blog faster.
Thank you Doreen, appreciate the nice words 🙂
Glad you found it useful, Jodie 🙂